
Sparkly Shoes
So New Year's Eve is creeping up fast! The typical New Year's Eve theme is sparkles. Sparkly top, sparkly skirt, or sparkly shoes. That day is an excuse to get super dressed up and go extravagant! I really love a good sparkly shoe. I think shoes really make or break an outfit. I found a couple tutorials brought to you bynest design studio and Green Eyed Monster that give you easy instructions to dazzle your boring old heels. Check it out and let me know what you think!
DIY Gem Shoes

nest design studio

nest design studio
 nest design studio
Glitter Shoes


DIY Sequence Trees
Hey hey! I am super excited this post because it is my (and Shardi's) VERY OWN IDEA!! We were shopping at Pier 1 and saw these awesome sequence Christmas trees. We thought they were a-mazing...until we saw the price tag. Oh wow, they were expensive! Who has that kind of money to blow on a Christmas decoration piece that you use for one month a year?! Plus, you, of course, need more than one!! It was then that we decided we would try and make one!! We went to our local Hobby Lobby and picked up a few bags of sequence, some pins, and some styrofoam Christmas trees. We then got to crafting! These trees aren't the quickest craft in the world, but they are definitely beautiful! They make a great decoration piece and gift! I gave them to my whole family last year for Christmas. Everyone loved this awesome homemade gift! I did colors that would match their living rooms or bedrooms. Here's a tutorial on how to make your very own sequence Christmas tree and pictures of some I have made. Let me know what you think!!!
DIY Sequence Trees

What you need:
Sequence (small & large)

Small Pins

Styrofoam tree

An organizer box (Optional)

Steps
Pick your colors for your tree & buy your sequence. Get BIG and small sequence. You can use any variety of colors you would like. Make sure to get a couple different colors in both sizes, unless you want your tree one color, which is fine!!
Put a small sequence on a pin and then stick the big sequence through the pin after it. I didn't use the hole for the big sequence, because I felt it was too close to the edge. I just poked it in a little further. It should look like this:


I like to pre-make a bunch of these for the tree, so it goes faster!

Once you pre-make some, start sticking them in the tree! I found that starting on the bottom and working your way to the top, works the best.


Go up all the way to the top! If you have any open space, you can fill it in with your small sequence. The top of mine looks like this:

Here is the finished product!!
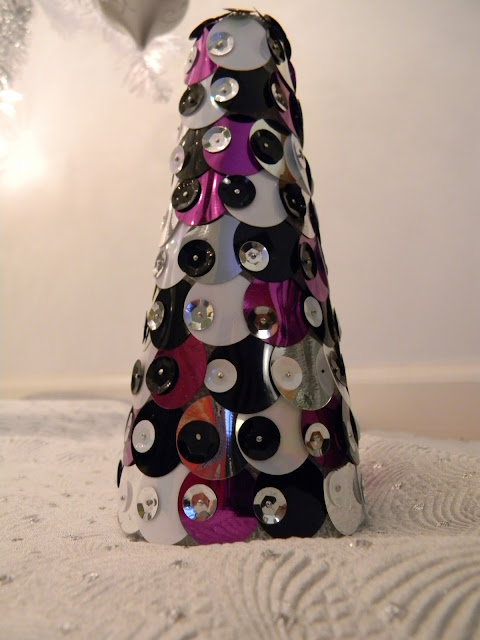 Voila!!
Here are some more! Send me your pictures!


Sunday, December 11, 2011
DIY Snow Globes
I think we can all agree that there are infinite purposes of mason jars. Well, I found the best use for one. My bestie, Shardi and I first came across these snow globes in a mason jar, at Anthropologie. They are the cutest! They had salt shaker snow globes too..so clever. But again, why buy it, when you can make it?! Everybody loves a good snow globe. They are great Christmas decorations and good gifts too! I love how you can personalize them for each person. Make a Star Wars one for your nerdy brother, a bird one for your grandma, and a basketball one for your boyfriend. You can put them in a jar or any kind of bottle. I personally love a good snow globe, especially the Disney princess ones. Annndd.. you guys know where to find me if you ever spot a good Harry Potter snow globe. Anyways, I found an easy tutorial online, thanks to Julie Ann Art, so here you are my dears! Be creative!
DIY Mason Jar Snow Globes
 What you'll need:
Any jar that seals
Distilled Water
Liquid Glycerin (available at drugstores)
Glitter
Figurines
Epoxy/Crazy Glue
What you'll need:
Any jar that seals
Distilled Water
Liquid Glycerin (available at drugstores)
Glitter
Figurines
Epoxy/Crazy Glue
Using the Crazy Glue, attach your figurines to the lid of the mason jar. Let them dry completely. (I waited 24 hours to be sure.)
 Next, fill your jar almost to the top with distilled water. Add a dash of liquid glycerin (this is used to make the glitter fall more slowly). The amount is glitter you add is sort of at your own discretion. Screw the cap on tightly and shake your jar to get the glitter moving.
 That was easy, huh?! Here are some more cute ones for you to get inspiration from!!

penguin-necklace snowglobe

Snowman

apartmenttherapy.com
Thursday, December 8, 2011
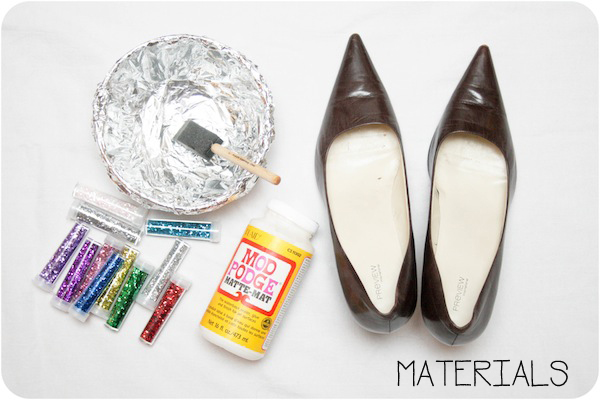
DIY Bath And Body
For those of you who need great homemade gift ideas or plans for a fun girl’s night, here are a few great ideas! Every girl I know loves beauty products. First of all, they make fantastic gifts for any girl. Secondly, we always need them! And thirdly, they are so dang cute! Man, are we suckers for them! We will pay 15 bucks for a small bottle of lotion! I would hate to add up all of the money I’ve spent on beauty products, especially chapstick. Right,Shardi? I picked some fun and easy-enough recipes for you guys to make your own stuff, whether it’s for yourself or someone else. How cute are they?! You can even tweek them a little bit, however you want…add some orange zest to your lemon…be creative!! I can’t wait to see how these turn out for me & for you as well! Love it!
Lemon Salt Scrub
This first tutorial is for Lemon Salt Scrub, brought to you by Kitchen Misfit. Check out her stuff because she has more recipes for you guys! I love a good lemon scent because it is so fresh! A salt scrub is used to exfoliate dead skin from your body, leaving behind fresh, nourishing skin enriched with herbal ingredients. Stay fresh ladies!!

Lemon Salt Scrub
Ingredients
- 4 parts coarse sea salt (I used 1 cup)
- 1 part safflower oil (I used 1/4 cup. You may use any kind of non-smelly oil such as olive oil, sunflower oil, or sweet almond oil)
- Zest of one lemon
- 1 tsp lemon extract
Directions
- Combine all ingredients in a medium sized bowl with a spatula. Make sure that no water comes in contact with any of the ingredients, as it will cause the salt to dissolve
- To use, after showering, apply a tbsp or two on body. After a few minutes, rinse with warm water.
Candy Cane Sugar Scrub
Mmm....Candy canes & sugar. This will be hard not to eat! ha! This is brought to you by The Natural Beauty Workshop!! They're wonderful! A sugar scrub is used to nourish and moisturize your skin so it is baby soft! They usually make you smell delightful as well! This Candy Cane sugar scrub is perfect for the holidays! Enjoy!...And even though it looks yummy, please don't eat it! :)

Candy Cane Sugar Scrub
Ingredients
1/2 cup Shealoe Butter*
10 tablespoons Granulated White Sugar
1/2 teaspoon Red Jojoba Wax Beads
2 teaspoons White or Pale Yellow Beeswax
1/2 teaspoon of Peppermint Essential Oil** or Fragrance Oil
Directions
To create a duo-colored scrub, like the one pictured, you'll need two small mixing bowls. Add 5 Tablespoons of sugar to each bowl. In a double boiler, melt 1 teaspoon of white beeswax completely. Next, add 1/4 cup of Shealoe Butter to the double boiler and turn the burner off. Be careful to warm the Shealoe Butter very gently. Overheating Shealoe Butter can cause it to separate. When it has melted completely, stir the butter and wax mixture into one of the bowls of sugar. Next, add 1/4 teaspoon of fragrance or essential oil to the bowl and stir. Add 1/2 teaspoon of Red Jojoba Wax beads and mix well. Pour the mixture into a resealable bag. Repeat this process with the second bowl of sugar, this time, leaving the Red Jojoba Wax Beads out of the mixture. To make the piping easier, refrigerate the bags of scrub for ten-fifteen minutes. When the scrub is ready, roll one bag's contents into the corner of the bag and cut the  corner.Just like piping icing onto a cake, pipe your scrub onto the walls of a clear jar. This may take some practice, but even if you're lines aren't perfectly straight, it should create a lovely effect. Repeat this step with the second color of scrub. When the walls are covered, pipe the remaining scrub into the center of the jar in whatever style you prefer.
This scrub can also be made in one color. This is a little easier, but it still looks lovely. Instead of mixing two separate bowls, as described above, simply mix all of your ingredients in one bowl and spoon into a clear jar!
Packaging, Usage & Preservation
A natural or synthetic preservative may be added to this recipe at your own discretion. For information on preservatives, please visit our informational library. Without a preservative, this product should be used up as soon as possible, ideally within 3 weeks. If it not preserved, or if it is preserved with a natural agent, please handle this product with care. Keep the jar closed and in a cool, dry area. Do not bring the jar into the shower or bath. Instead, use a clean spoon or popsicle stick to scoop single portions into a paper or plastic cup.
This beautiful scrub looks great in a clear container. Try a PET jar to show it off!
Directions
There are many scrubbing techniques out there, but this is one I am particularly fond of. Step into the shower and before turning the water on, scrub your body all over! (Of course, avoiding very sensitive areas or broken skin.) When you are thoroughly scrubbed, turn the shower on and rinse. When the shower is over, make sure to moisturize your skin with a body oil, cream, or lotion.
*This scrub yields about 4 ounces of scrub. However, you may lose some product in the piping bags. To ensure that you make enough to completely fill a jar, you may want to add 1-2 extra tablespoons of Shealoe Butter to this recipe.
**Peppermint Essential Oil should not be used around babies and small children.
Hand-made sparkly strawberry lip balm
This lip balm is brought to you by Torie Jayne, who is a lip balm genius, I must say. Personally, I need a chapstick or lip balm wherever I go. Not only does it moisturize your lips, but it just looks cute. I'm not a fan of colored stuff because I hate getting it on my teeth, and if I look like a bum on the street, I don't want to have a fancy lip color on (it might give the wrong idea). So try this cutesy lip balm for yourself and make it for your friends too!

Christmas gift : Sparkly strawberry lip balm
Ingredients
- 2 tablespoons of white beeswax pellets (plus 1/2 tsp for the deer toppers)
- 4 tablespoons sunflower oil (1/2 tsp for deer)
- Few drops of strawberry essential oil
- Edible pink glitter
- Lipstick shavings
Packaging
- 6 small acrylic pots
- P1 address labels
- pink washi tape
- Self adhesive clear film
Equipment
- Mini deer mould
- Pipettes
- Microwavable glass jug
- Microwavable small glass jar
- Metal spoons
- Scissors
- Sharp knife

Sparkly strawberry lip balm, How-to step by step

Start by placing the beeswax pellets and oil in a glass jug in the microwave. Heat on low to medium power until the beeswax pellets have melted. Remove jug from microwave and stir with a metal spoon. Using a pipette, add a few drops of strawberry oil.

Gradually add lipstick shavings to the jug of liquid. Stir mixture with metal spoon and continue adding lipstick shavings until you achieve desired shade and the colour is even. Using a clean pipette, transfer lip balm to pots.

In a small glass pot, melt half a teaspoon of beeswax with a teaspoon of oil in the microwave until beeswax pellets have melted. Add a drop of strawberry oil and stir with a metal spoon. Using a clean pipette, fill deer mould with lip balm. As soon as the lip balm cools and turns white, use a sharp knife to remove excess from back. Wait a minute then turn out deer on to top of pink strawberry lip balm. Repeat until all strawberry lip balms have a white deer atop. Leave to set for one hour.

Wrap washi tape around each jar to secure lids.

Lovely
Sparkly Shoes
So New Year's Eve is creeping up fast! The typical New Year's Eve theme is sparkles. Sparkly top, sparkly skirt, or sparkly shoes. That day is an excuse to get super dressed up and go extravagant! I really love a good sparkly shoe. I think shoes really make or break an outfit. I found a couple tutorials brought to you bynest design studio and Green Eyed Monster that give you easy instructions to dazzle your boring old heels. Check it out and let me know what you think!
DIY Gem Shoes
nest design studio
nest design studio
nest design studio
Glitter Shoes
Sparkly Shoes
So New Year's Eve is creeping up fast! The typical New Year's Eve theme is sparkles. Sparkly top, sparkly skirt, or sparkly shoes. That day is an excuse to get super dressed up and go extravagant! I really love a good sparkly shoe. I think shoes really make or break an outfit. I found a couple tutorials brought to you bynest design studio and Green Eyed Monster that give you easy instructions to dazzle your boring old heels. Check it out and let me know what you think!
DIY Gem Shoes
Glitter Shoes
DIY Gem Shoes
 |
| nest design studio |
 |
nest design studio
|


DIY Sequence Trees
Hey hey! I am super excited this post because it is my (and Shardi's) VERY OWN IDEA!! We were shopping at Pier 1 and saw these awesome sequence Christmas trees. We thought they were a-mazing...until we saw the price tag. Oh wow, they were expensive! Who has that kind of money to blow on a Christmas decoration piece that you use for one month a year?! Plus, you, of course, need more than one!! It was then that we decided we would try and make one!! We went to our local Hobby Lobby and picked up a few bags of sequence, some pins, and some styrofoam Christmas trees. We then got to crafting! These trees aren't the quickest craft in the world, but they are definitely beautiful! They make a great decoration piece and gift! I gave them to my whole family last year for Christmas. Everyone loved this awesome homemade gift! I did colors that would match their living rooms or bedrooms. Here's a tutorial on how to make your very own sequence Christmas tree and pictures of some I have made. Let me know what you think!!!
DIY Sequence Trees
DIY Sequence Trees

What you need:
Sequence (small & large)

Small Pins

Styrofoam tree

An organizer box (Optional)

Steps
Pick your colors for your tree & buy your sequence. Get BIG and small sequence. You can use any variety of colors you would like. Make sure to get a couple different colors in both sizes, unless you want your tree one color, which is fine!!
Put a small sequence on a pin and then stick the big sequence through the pin after it. I didn't use the hole for the big sequence, because I felt it was too close to the edge. I just poked it in a little further. It should look like this:
I like to pre-make a bunch of these for the tree, so it goes faster!
Once you pre-make some, start sticking them in the tree! I found that starting on the bottom and working your way to the top, works the best.
Go up all the way to the top! If you have any open space, you can fill it in with your small sequence. The top of mine looks like this:

Here is the finished product!!
Voila!!
Here are some more! Send me your pictures!


Sunday, December 11, 2011
DIY Snow Globes
I think we can all agree that there are infinite purposes of mason jars. Well, I found the best use for one. My bestie, Shardi and I first came across these snow globes in a mason jar, at Anthropologie. They are the cutest! They had salt shaker snow globes too..so clever. But again, why buy it, when you can make it?! Everybody loves a good snow globe. They are great Christmas decorations and good gifts too! I love how you can personalize them for each person. Make a Star Wars one for your nerdy brother, a bird one for your grandma, and a basketball one for your boyfriend. You can put them in a jar or any kind of bottle. I personally love a good snow globe, especially the Disney princess ones. Annndd.. you guys know where to find me if you ever spot a good Harry Potter snow globe. Anyways, I found an easy tutorial online, thanks to Julie Ann Art, so here you are my dears! Be creative!
DIY Mason Jar Snow Globes
What you'll need:
Any jar that seals
Distilled Water
Liquid Glycerin (available at drugstores)
Glitter
Figurines
Epoxy/Crazy Glue
Using the Crazy Glue, attach your figurines to the lid of the mason jar. Let them dry completely. (I waited 24 hours to be sure.)
Next, fill your jar almost to the top with distilled water. Add a dash of liquid glycerin (this is used to make the glitter fall more slowly). The amount is glitter you add is sort of at your own discretion. Screw the cap on tightly and shake your jar to get the glitter moving.
That was easy, huh?! Here are some more cute ones for you to get inspiration from!!
|
| penguin-necklace snowglobe |

|
| Snowman |
|
| apartmenttherapy.com |
Thursday, December 8, 2011
DIY Bath And Body
For those of you who need great homemade gift ideas or plans for a fun girl’s night, here are a few great ideas! Every girl I know loves beauty products. First of all, they make fantastic gifts for any girl. Secondly, we always need them! And thirdly, they are so dang cute! Man, are we suckers for them! We will pay 15 bucks for a small bottle of lotion! I would hate to add up all of the money I’ve spent on beauty products, especially chapstick. Right,Shardi? I picked some fun and easy-enough recipes for you guys to make your own stuff, whether it’s for yourself or someone else. How cute are they?! You can even tweek them a little bit, however you want…add some orange zest to your lemon…be creative!! I can’t wait to see how these turn out for me & for you as well! Love it!
Lemon Salt Scrub
This first tutorial is for Lemon Salt Scrub, brought to you by Kitchen Misfit. Check out her stuff because she has more recipes for you guys! I love a good lemon scent because it is so fresh! A salt scrub is used to exfoliate dead skin from your body, leaving behind fresh, nourishing skin enriched with herbal ingredients. Stay fresh ladies!!

Lemon Salt Scrub
Ingredients
- 4 parts coarse sea salt (I used 1 cup)
- 1 part safflower oil (I used 1/4 cup. You may use any kind of non-smelly oil such as olive oil, sunflower oil, or sweet almond oil)
- Zest of one lemon
- 1 tsp lemon extract
Directions
- Combine all ingredients in a medium sized bowl with a spatula. Make sure that no water comes in contact with any of the ingredients, as it will cause the salt to dissolve
- To use, after showering, apply a tbsp or two on body. After a few minutes, rinse with warm water.
Candy Cane Sugar Scrub
Mmm....Candy canes & sugar. This will be hard not to eat! ha! This is brought to you by The Natural Beauty Workshop!! They're wonderful! A sugar scrub is used to nourish and moisturize your skin so it is baby soft! They usually make you smell delightful as well! This Candy Cane sugar scrub is perfect for the holidays! Enjoy!...And even though it looks yummy, please don't eat it! :)

Candy Cane Sugar Scrub
Ingredients
1/2 cup Shealoe Butter*
10 tablespoons Granulated White Sugar
1/2 teaspoon Red Jojoba Wax Beads
2 teaspoons White or Pale Yellow Beeswax
1/2 teaspoon of Peppermint Essential Oil** or Fragrance Oil
Directions
To create a duo-colored scrub, like the one pictured, you'll need two small mixing bowls. Add 5 Tablespoons of sugar to each bowl. In a double boiler, melt 1 teaspoon of white beeswax completely. Next, add 1/4 cup of Shealoe Butter to the double boiler and turn the burner off. Be careful to warm the Shealoe Butter very gently. Overheating Shealoe Butter can cause it to separate. When it has melted completely, stir the butter and wax mixture into one of the bowls of sugar. Next, add 1/4 teaspoon of fragrance or essential oil to the bowl and stir. Add 1/2 teaspoon of Red Jojoba Wax beads and mix well. Pour the mixture into a resealable bag. Repeat this process with the second bowl of sugar, this time, leaving the Red Jojoba Wax Beads out of the mixture. To make the piping easier, refrigerate the bags of scrub for ten-fifteen minutes. When the scrub is ready, roll one bag's contents into the corner of the bag and cut the
 corner.Just like piping icing onto a cake, pipe your scrub onto the walls of a clear jar. This may take some practice, but even if you're lines aren't perfectly straight, it should create a lovely effect. Repeat this step with the second color of scrub. When the walls are covered, pipe the remaining scrub into the center of the jar in whatever style you prefer.
This scrub can also be made in one color. This is a little easier, but it still looks lovely. Instead of mixing two separate bowls, as described above, simply mix all of your ingredients in one bowl and spoon into a clear jar!
Packaging, Usage & Preservation
A natural or synthetic preservative may be added to this recipe at your own discretion. For information on preservatives, please visit our informational library. Without a preservative, this product should be used up as soon as possible, ideally within 3 weeks. If it not preserved, or if it is preserved with a natural agent, please handle this product with care. Keep the jar closed and in a cool, dry area. Do not bring the jar into the shower or bath. Instead, use a clean spoon or popsicle stick to scoop single portions into a paper or plastic cup.
This beautiful scrub looks great in a clear container. Try a PET jar to show it off!
Directions
There are many scrubbing techniques out there, but this is one I am particularly fond of. Step into the shower and before turning the water on, scrub your body all over! (Of course, avoiding very sensitive areas or broken skin.) When you are thoroughly scrubbed, turn the shower on and rinse. When the shower is over, make sure to moisturize your skin with a body oil, cream, or lotion.
*This scrub yields about 4 ounces of scrub. However, you may lose some product in the piping bags. To ensure that you make enough to completely fill a jar, you may want to add 1-2 extra tablespoons of Shealoe Butter to this recipe.
**Peppermint Essential Oil should not be used around babies and small children.
Hand-made sparkly strawberry lip balm
This lip balm is brought to you by Torie Jayne, who is a lip balm genius, I must say. Personally, I need a chapstick or lip balm wherever I go. Not only does it moisturize your lips, but it just looks cute. I'm not a fan of colored stuff because I hate getting it on my teeth, and if I look like a bum on the street, I don't want to have a fancy lip color on (it might give the wrong idea). So try this cutesy lip balm for yourself and make it for your friends too!

Christmas gift : Sparkly strawberry lip balm
Ingredients
- 2 tablespoons of white beeswax pellets (plus 1/2 tsp for the deer toppers)
- 4 tablespoons sunflower oil (1/2 tsp for deer)
- Few drops of strawberry essential oil
- Edible pink glitter
- Lipstick shavings
Packaging
- 6 small acrylic pots
- P1 address labels
- pink washi tape
- Self adhesive clear film
Equipment
- Mini deer mould
- Pipettes
- Microwavable glass jug
- Microwavable small glass jar
- Metal spoons
- Scissors
- Sharp knife
Sparkly strawberry lip balm, How-to step by step
Start by placing the beeswax pellets and oil in a glass jug in the microwave. Heat on low to medium power until the beeswax pellets have melted. Remove jug from microwave and stir with a metal spoon. Using a pipette, add a few drops of strawberry oil.
Gradually add lipstick shavings to the jug of liquid. Stir mixture with metal spoon and continue adding lipstick shavings until you achieve desired shade and the colour is even. Using a clean pipette, transfer lip balm to pots.
In a small glass pot, melt half a teaspoon of beeswax with a teaspoon of oil in the microwave until beeswax pellets have melted. Add a drop of strawberry oil and stir with a metal spoon. Using a clean pipette, fill deer mould with lip balm. As soon as the lip balm cools and turns white, use a sharp knife to remove excess from back. Wait a minute then turn out deer on to top of pink strawberry lip balm. Repeat until all strawberry lip balms have a white deer atop. Leave to set for one hour.
Wrap washi tape around each jar to secure lids.
Lovely
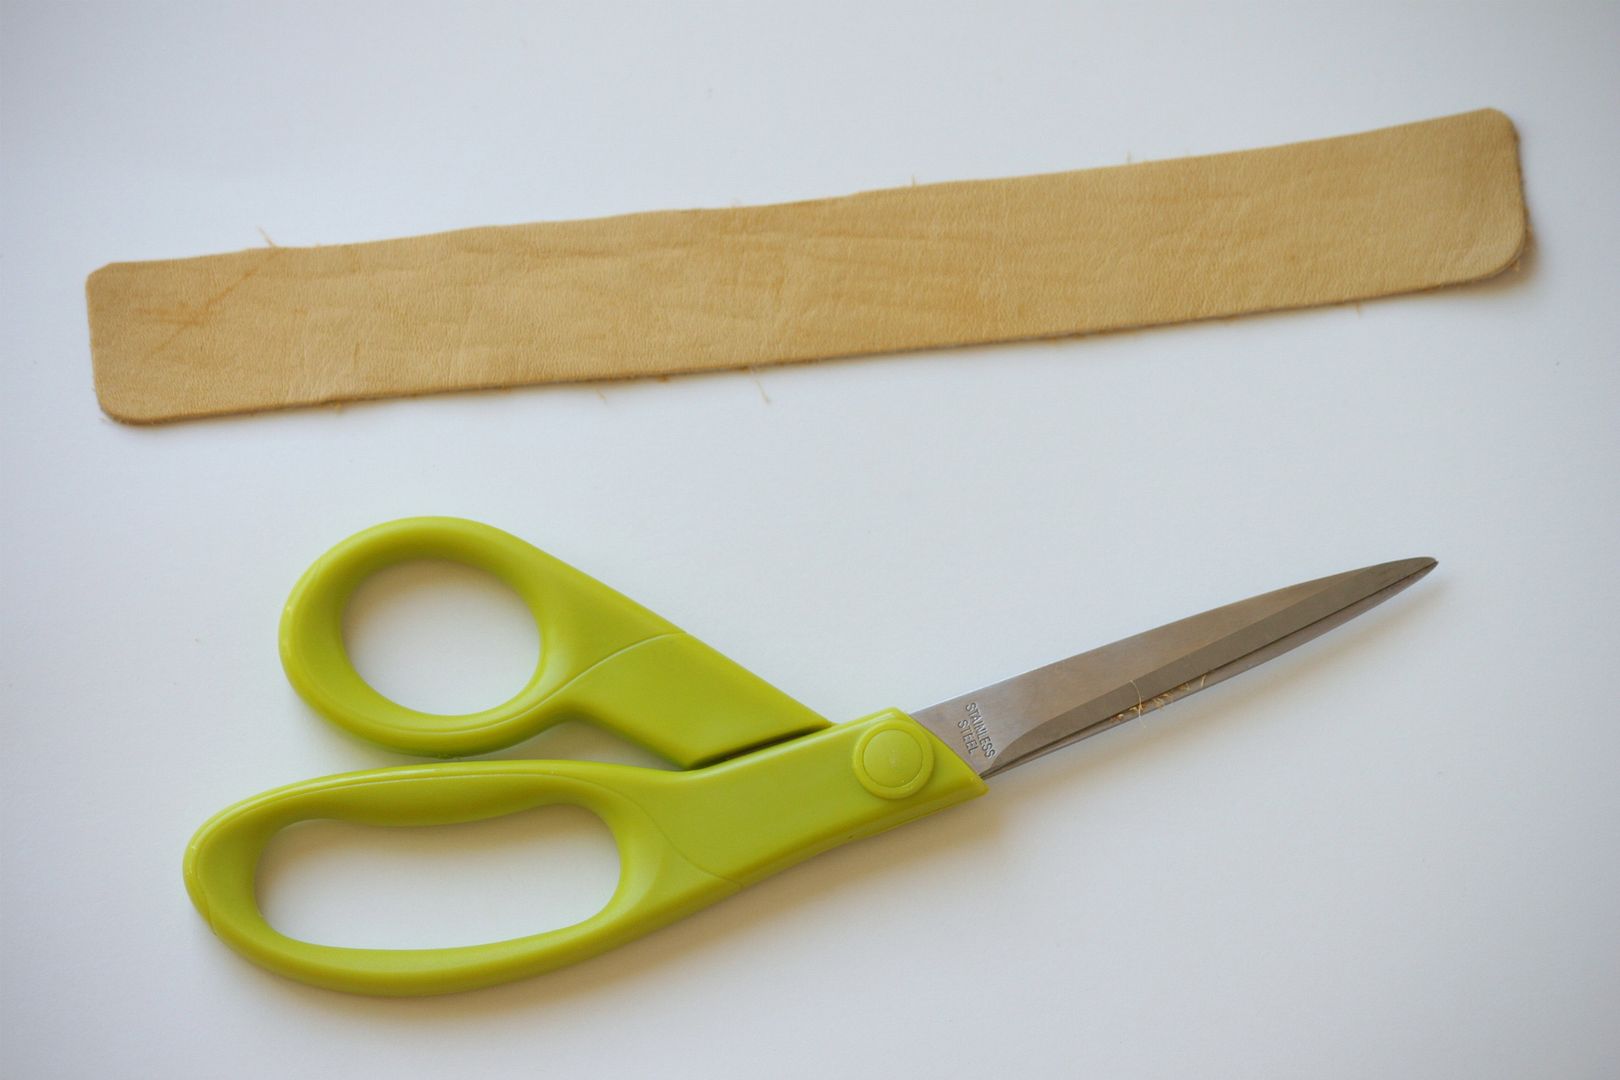
Leather Bracelets
Hey Crafters!
Need a creative, one-of-a-kind Christmas gift for a girlfriend? How about a leather bracelet, or two?! I have two great tutorials for you today, thanks to Delighted Momma and Oh the lovely things, on making two different kinds of lovely leather bracelets!. I thought both of these were just delightful :) I love unique projects like these! You can find all of the supplies for these cuties at your local craft store. My local Jo-Anne's has a light tan color, dark tan color, and a black color to choose from. I like the black and dark tan the best! They are about $4 for one strip. You need an entire strip of leather for the bow bracelet, but I bet you can get two bracelets out of one strip of leather for the painted chevron bracelet. Not a bad deal! The only frustrating part for me with the bow bracelet, was getting my needle through the leather. Not the easiest task in the world, but 5 minutes of frustration is so worth this awesome bracelet. Check it out and let me know what you think! Happy crafting!

You will need :
- A piece of leather, approx. 22cm x 10cm (approx. 8.7" x 4")
- Scissors
- Leather glue or super glue
- Thread
- A snap button
1. Cut an oval piece of leather, approx. 22cm x 10cm (approx. 8.7" x 4"). You can make it longer or smaller, depending on the size of your wrist.

2. Form a bow.

3. Secure the bow by wrapping thread around it and knot.

4. Cut a small rectangle of leather, approx. 4cm x 1cm / 1.6" x 0.4"

5. Glue the small band of leather over the thread.

6. Sew the snap button, one part of the button at one end of the leather, and the other at the other side.

And Voila!

What you will need:


Need a creative, one-of-a-kind Christmas gift for a girlfriend? How about a leather bracelet, or two?! I have two great tutorials for you today, thanks to Delighted Momma and Oh the lovely things, on making two different kinds of lovely leather bracelets!. I thought both of these were just delightful :) I love unique projects like these! You can find all of the supplies for these cuties at your local craft store. My local Jo-Anne's has a light tan color, dark tan color, and a black color to choose from. I like the black and dark tan the best! They are about $4 for one strip. You need an entire strip of leather for the bow bracelet, but I bet you can get two bracelets out of one strip of leather for the painted chevron bracelet. Not a bad deal! The only frustrating part for me with the bow bracelet, was getting my needle through the leather. Not the easiest task in the world, but 5 minutes of frustration is so worth this awesome bracelet. Check it out and let me know what you think! Happy crafting!
Leather bow cuff bracelet
You will need :
- A piece of leather, approx. 22cm x 10cm (approx. 8.7" x 4")
- Scissors
- Leather glue or super glue
- Thread
- A snap button
1. Cut an oval piece of leather, approx. 22cm x 10cm (approx. 8.7" x 4"). You can make it longer or smaller, depending on the size of your wrist.
2. Form a bow.
3. Secure the bow by wrapping thread around it and knot.
4. Cut a small rectangle of leather, approx. 4cm x 1cm / 1.6" x 0.4"
5. Glue the small band of leather over the thread.
6. Sew the snap button, one part of the button at one end of the leather, and the other at the other side.
And Voila!
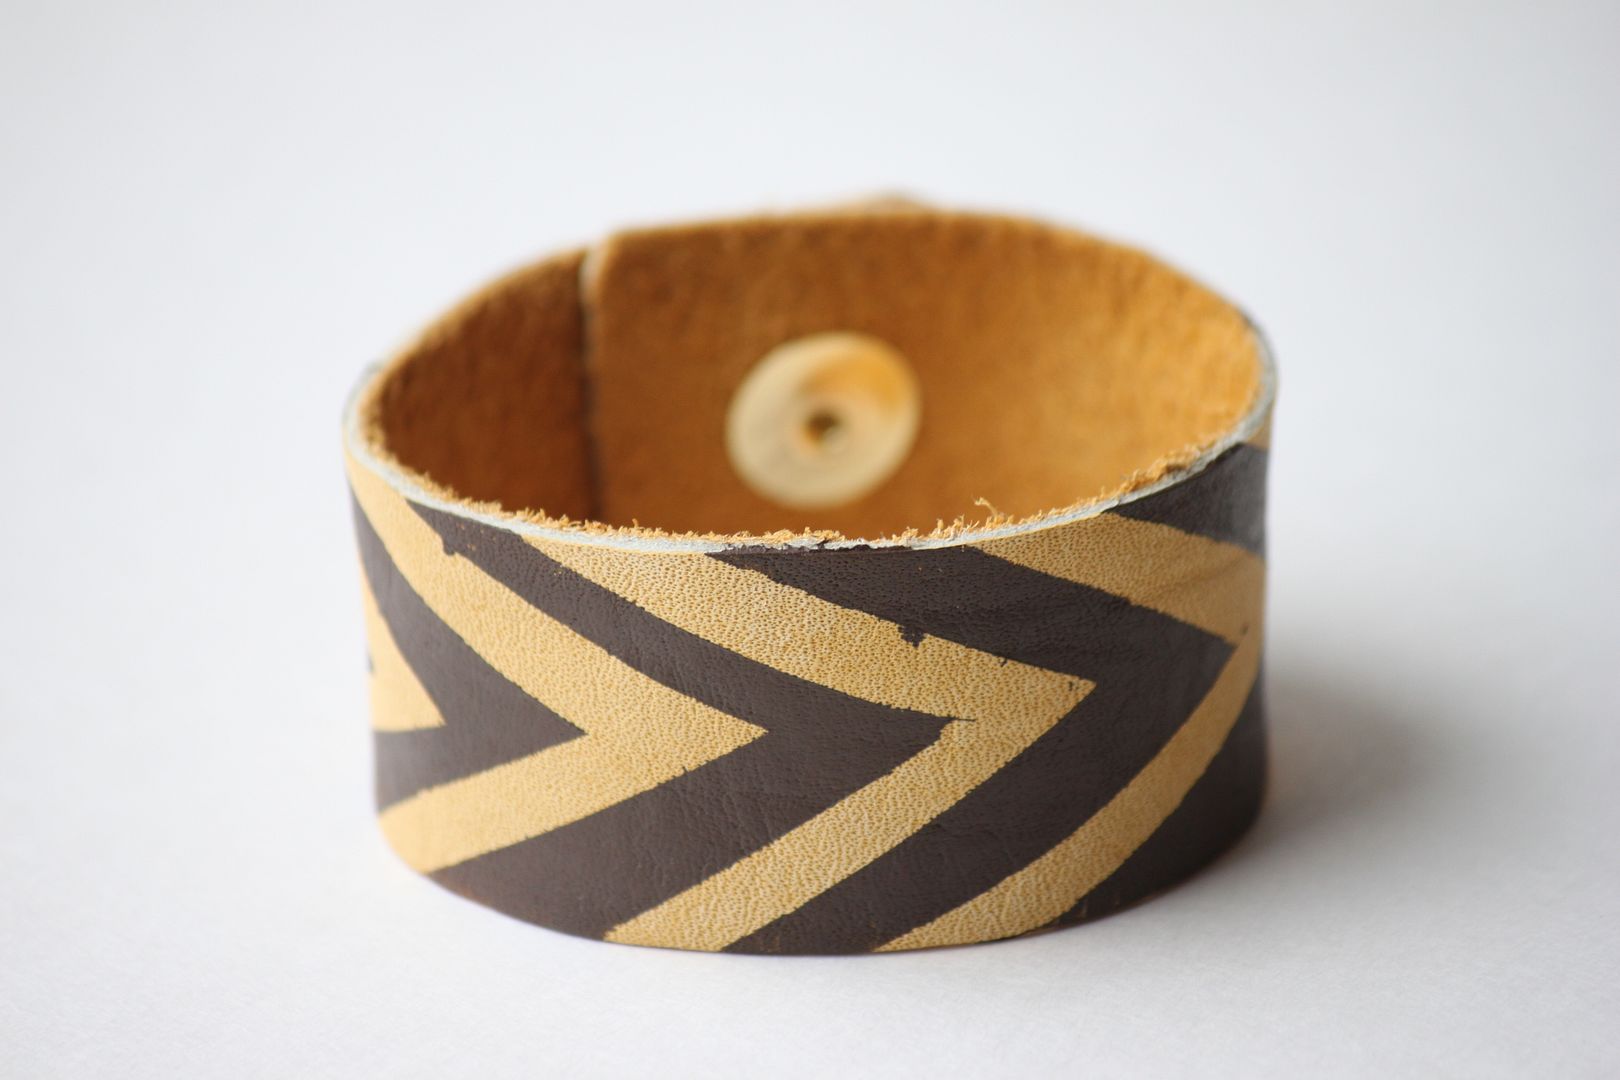
DIY Painted Chevron Bracelet
- Strip of leather (found at Michaels)
- Some kind of closure. I used button snaps
- Paint brush
- Acrylic paint
- Scissors
- Blue painters tape
Decide how wide you want your bracelet and cut the leather accordingly.
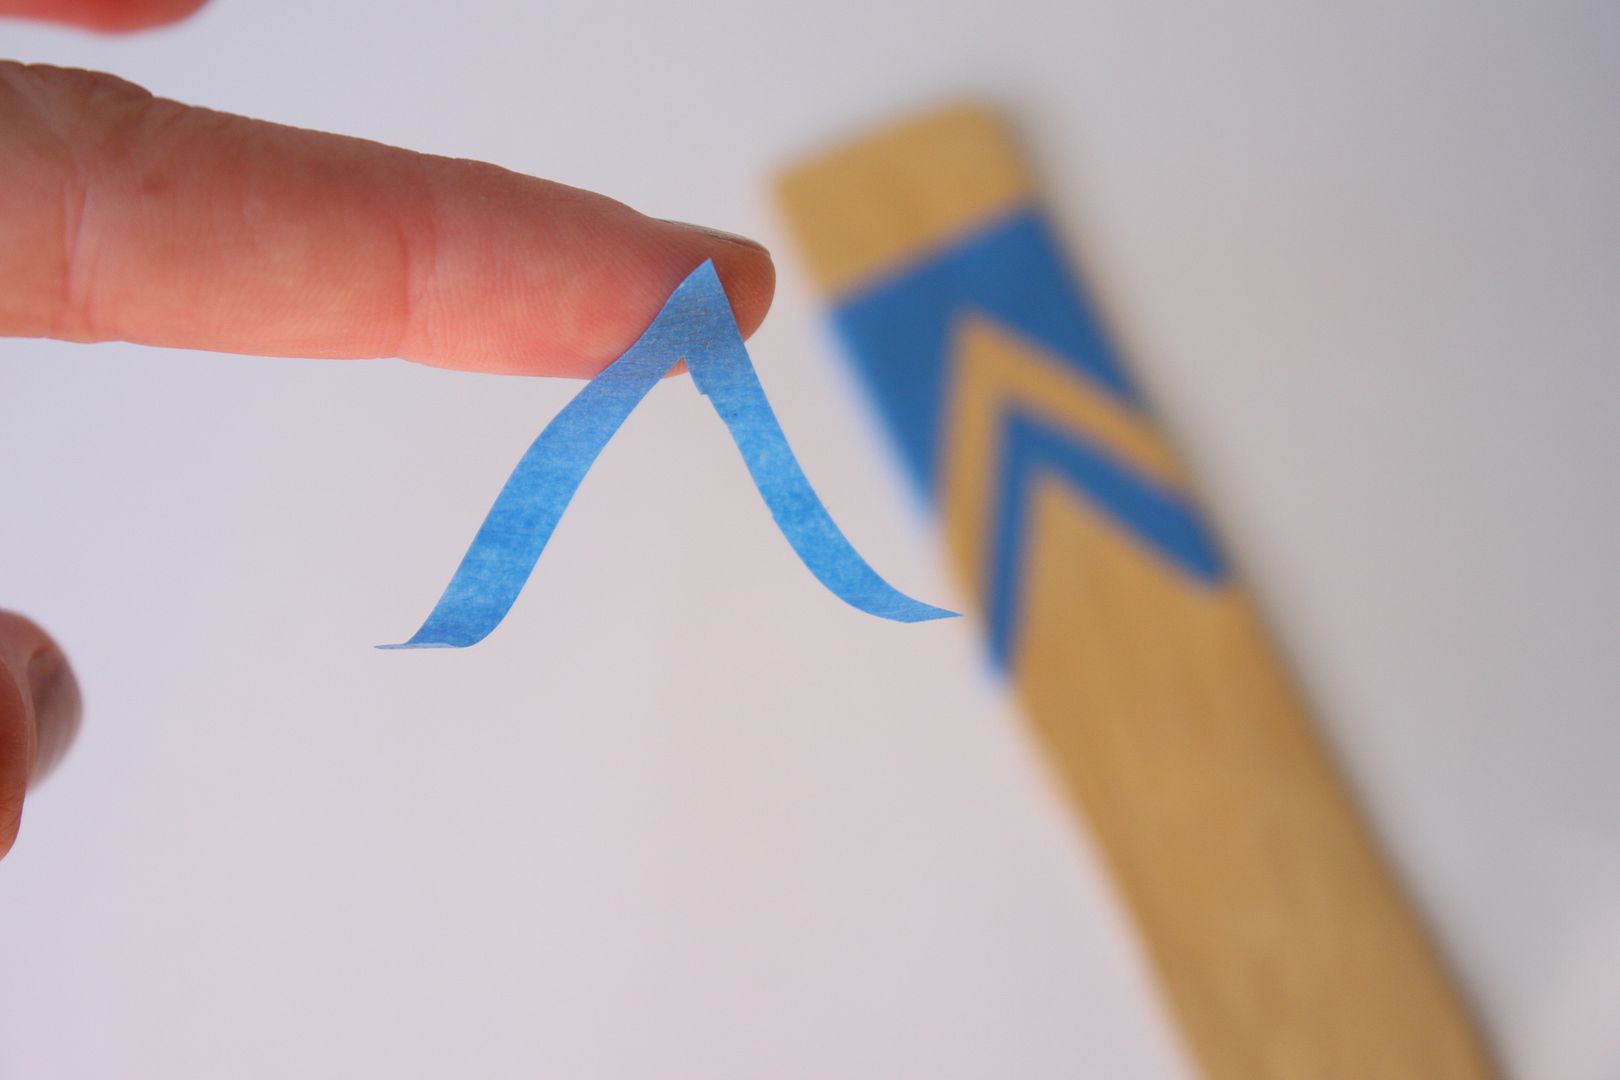
Cut out thin triangle strips like above and place evenly spaced along the leather strip.
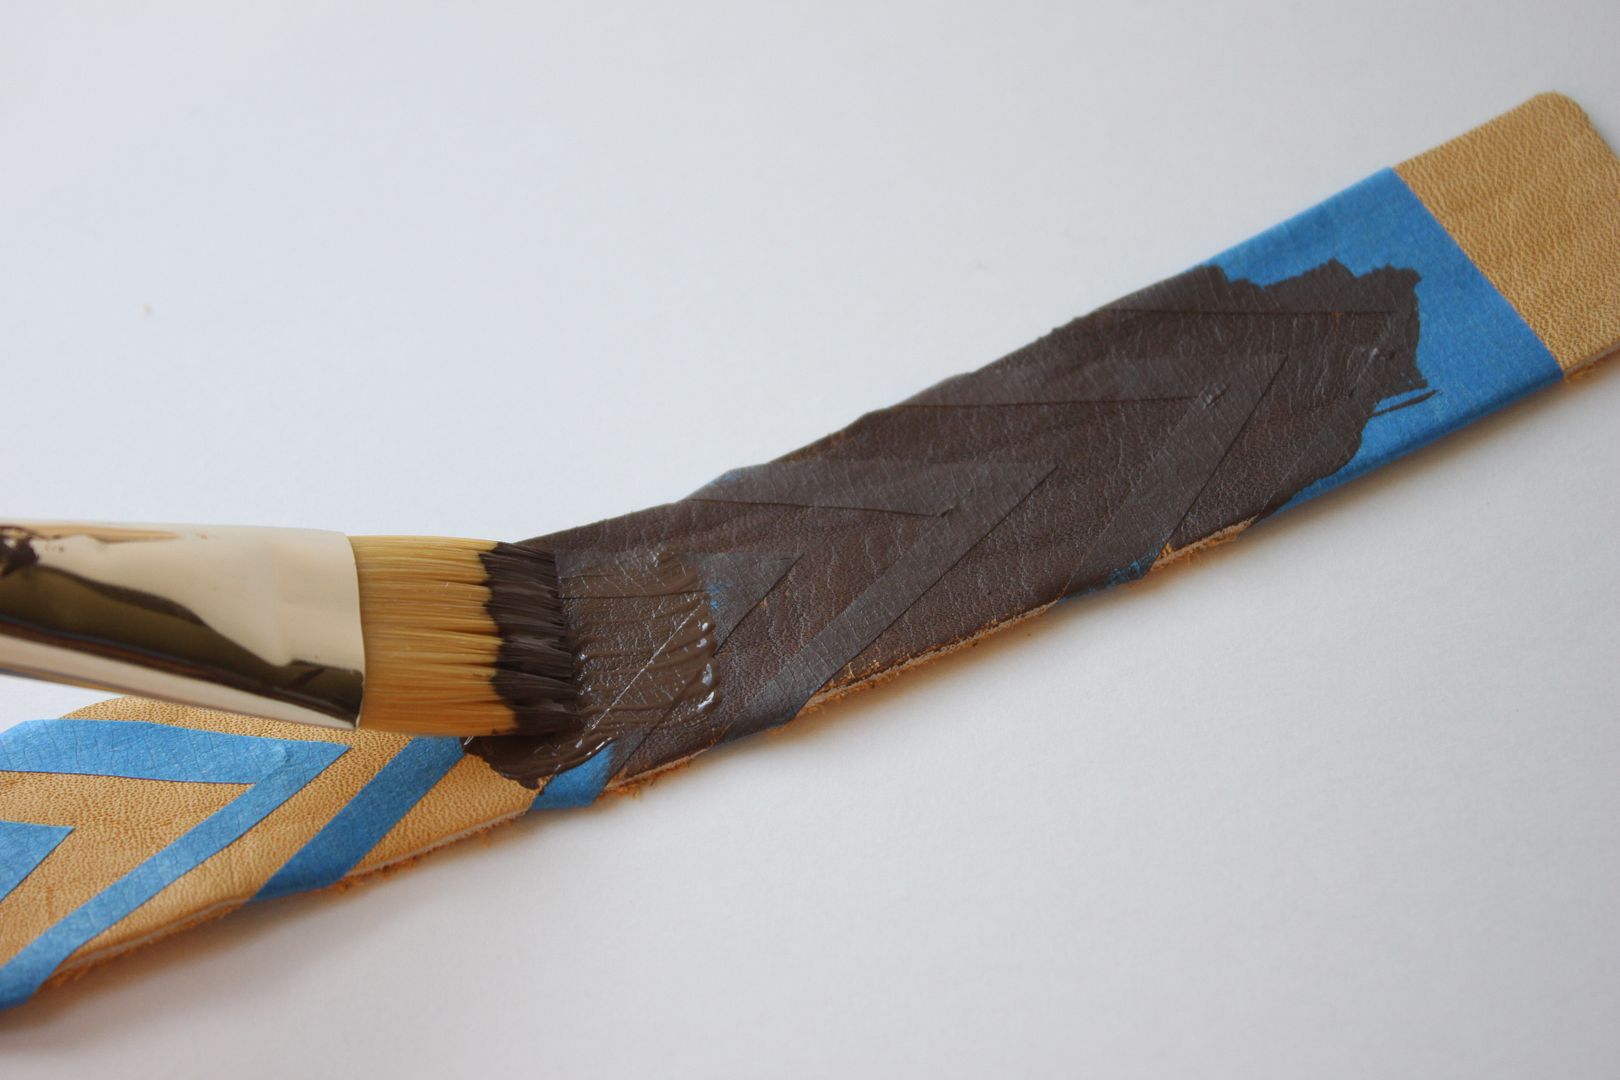
Paint the strip of leather.
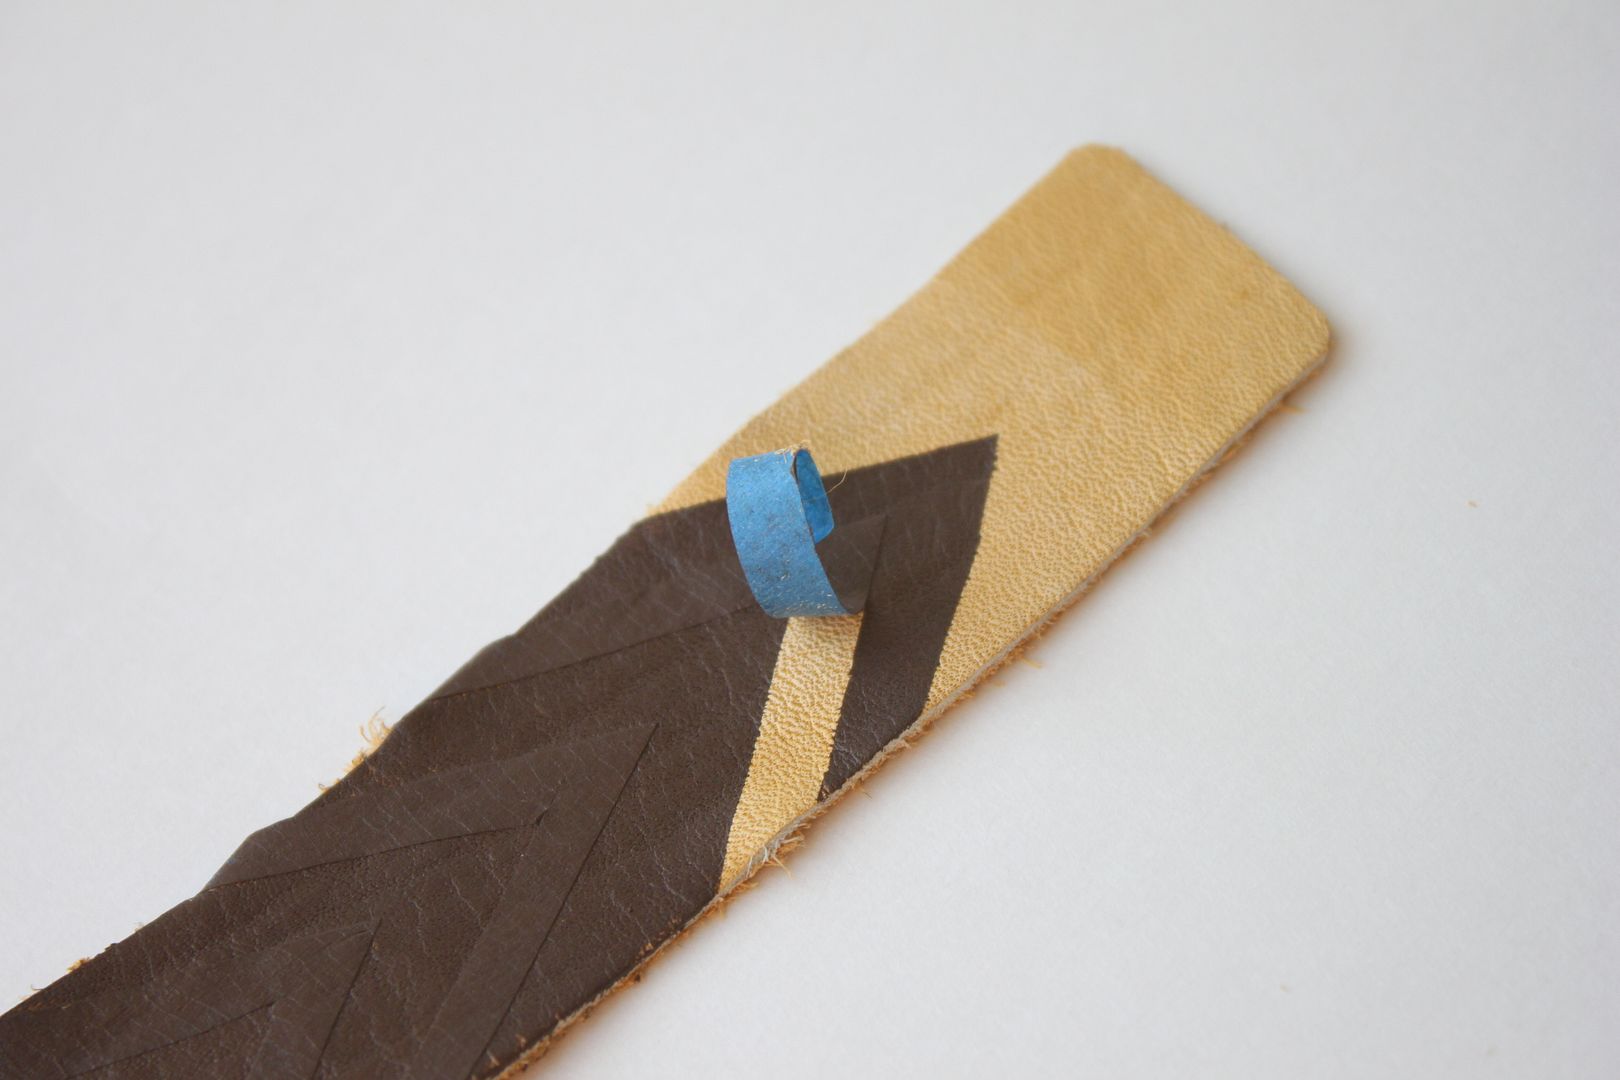
Wait about 20 minutes until the paint is dry.
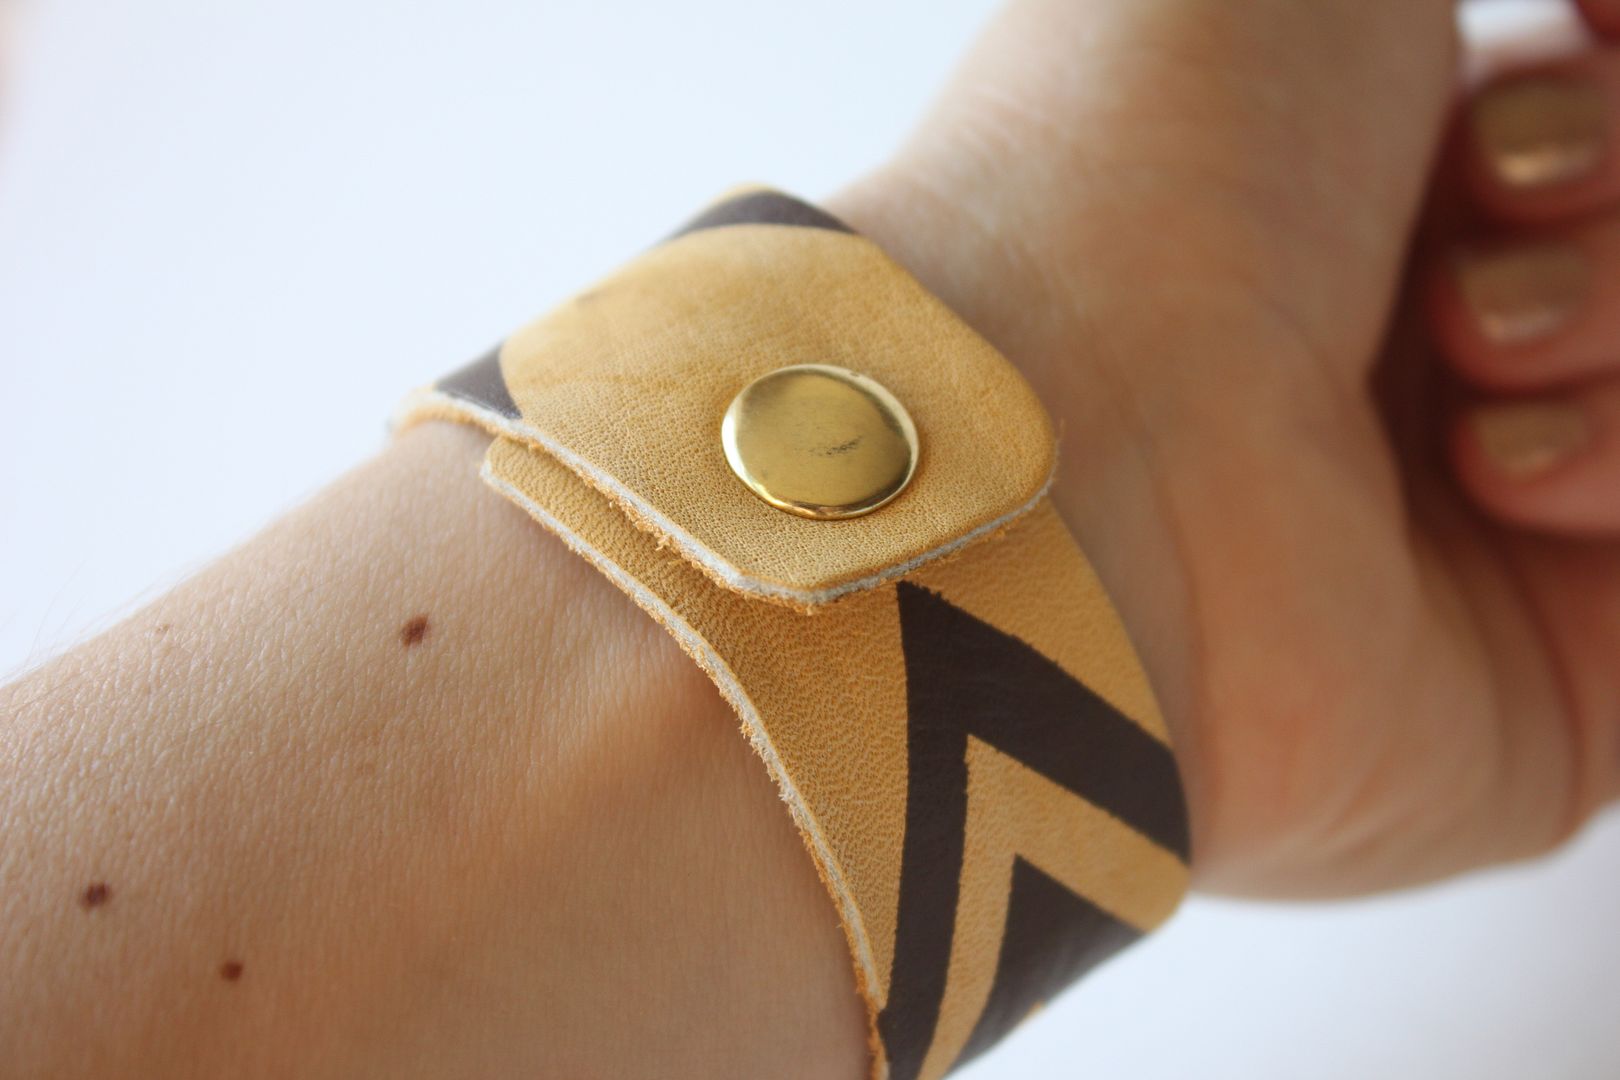
Attach the button closure.
Ornaments
Hey pretties!
I think we have all made our own Christmas ornaments at one time or another. If you're like me, you have a bunch of gaudy ones from grade school with your face plastered on the front of it. Oh, yay... ;) Even if you had the worst buck teeth ever, Mom probably still to this day, loves to put it front-and-center on the Christmas tree. Lucky you! I assure you that not all homemade ornaments are bad! I love making my own ornaments; it really puts me in the Christmas mood. Whether you make a paper, felt, plastic, or glass ornament, it is better than the rest because YOU made it! With all of these cute DIY ornaments, you can switch out all of your old embarrassing ornaments for these cute ones! Goodbye buck teeth! Most of these awesome ornaments have tutorials for them, so click on the links underneath the pictures to find out how to make them!
You can buy glass or plastic ornaments like these at craft stores that are empty and you can just pull the tops right off and back on. Stuff them with paper, feathers, little painted styrofoam balls, glitter, leaves, or even paint them! Be creative! Send me pictures of the ones you make and I'll put them up! Happy crafting!
 | ||||||||||||||||||||||||||||||||||||||||||||||||||||||||||||||||||||||||||||||||||||||||||||||||||||||||||||||||||||||||||
| Elisa McLaughlin |
 | ||||||||||||||||||||||||||||||||||||||||||||||||||||||||||||||||||||||||||||||||||||||||
| Laura wears |
 | |||
| Cook-Love-Craft |
 | ||
| dontbothermeimreading |
 The Cheese Thief The Cheese Thief |
| The Cheese Thief |
 | |
| Creations by Kara |
 |
| The Cheese Thief |
 |
| Craft bits |
 |
| Compulsive Craftiness |
 |
| Craft bits |
Stockings
Hello lovlies!
For me, Christmas morning would not be the same without a full stocking! I don't know why, but it is so fun to find a million (maybe not that many) little things stuffed to the max in a giant sock. Stockings also really dress up a room for the Holidays. Whether you have two or five stockings, they always look so stinkin' cute! They can be hung from a fireplace, staircase, window ledge, door, or anywhere you can think of! They also make fantastic gifts. You can really personalize a stocking for someone, and like I said, it's not that hard! You will come to realize that I am a fan of simple, but awesome crafts. So here, if you're boyfriend/husband likes a certain football team, then make him a stocking with his favorite team logo and colors. If you're Mom has a really fancy living room, make her stockings to match! If you have a fun, one-of-a-kind best friend like I do, make her a busy and eccentric one! Be creative! Even add their names on them! (or nicknames). I like to make my stockings extra large so that a lot of stuff can be put in there! But of course I also like to make them cute! And you don't have to make it shaped like a sock! Think outside of the box! You can be different and do a jester style, a high heel, or a boot if you want. If you sew, it is pretty easy to make a basic stocking. You basically draw out a pattern of your stocking, cut it out, and sew it together. If you don't know how to sew, you could always buy a basic stocking or get an old one, and dress it up using a hot glue gun. I'm not always the best sewer, but I am a master of the hot glue gun! I'm working on one that I will post when it's finished (hopefully soon). Here are some stockings I found to get you inspired. These are sincerely the most fun stockings ever! Some of them you can even buy! Click on the captions for their original site. Don't forget to send me yours so that I can post them! Happy sewing! (Or gluing)
Items you can use to dress up a stocking
-Patterned fabric
-Fringe
-Jingle bells
-Feathers
-Ruffles
-Poms
-GLITTER
-Fabric paint
-Fur
-Buttons
-Fabric
-Bows
 |
| UrbanCreative |
 |
| RavenBear |
 |
| GoodWishesQuilts |


Yarn Wreaths
I don't know about you, but I'm pretty sick of seeing the same ol' Christmas wreaths every year engulfed with greenery. It's almost 2012 people, lets update! I found some of these yarn wrapped wreaths online and I just fell in love with them! I had to make one for myself! Don't get scared, they are pretty easy! The only annoying part is wrapping the styrofoam ring over and over again with a big ball of yarn. There is no quick way to do this! But if you happen to be a genius and figure out a fast way, please save me. I made this green, white, and silver wreath to match my bedroom. I went to my local craft store and picked out some of this cute stuff for about $15. You can get any color of yarn you want and any decorations that stand out to you and your pretty self. Be creative! I love love love green and silver together. They're kind of my thing. I would definitely get a rounded styrofoam ring for your base. They have squared ones and straw ones, but I think these smooth, rounded ones work just right.

-Styrofoam ring or something of the sort
-Yarn (any color)
-Decorations
-Hot glue gun
-Pins
Okay, this is pretty simple, I promise! First, glue the end of the yarn to the back of the wreath, and just start wrapping (neatly!). You can choose to wrap once, or wrap 5 times. It is your choice! Once you take five hours to get that done (only joking..), start gluing and pinning all of your decorations on. Layer them however you would like. I covered the stems of the pretties with the the flowers. There is no fancy way of doing this. As long as you position it the way you want and it is secure, then your wreath is great!
Here is my finished wreath!!!
 | ||
| Pretty, huh? |
 |
| BabyBabyLemon |
 |
ItzFitz |
No comments:
Post a Comment