
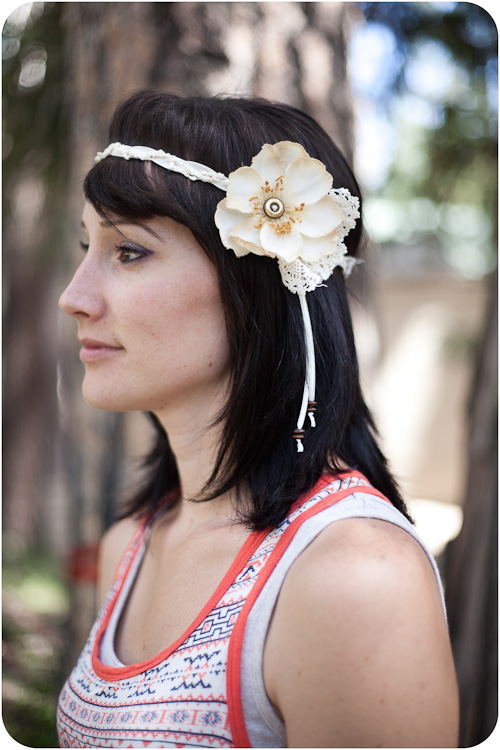
Braided Bohemian Headband
Courtesy of Elisa Mclaughlin Designs
Materials:
20 inches of three types of lace or ribbon. You may want to double up if one of your strands of lace or ribbon is significantly narrower than the others. As you can see in the picture I used two strands of the narrowest type of ribbon to even out everything.
Scissors
2.5 inches of elastic
Sewing Machine (glue will work also)
EXTRAS:
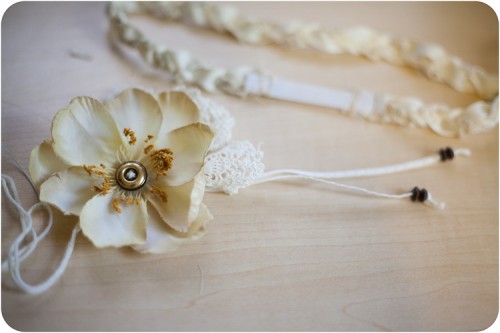
If you want to make the flower extras you will need. A silk flower, a button, some extra ribbon, a couple of wooden beads, and a crocheted doily.


Ok, Lets get started! Tape your three equal lengths of ribbon and lace to a flat surface.

Braid the lengths and tape them together at the other end. The length of the braid should now be around 18 inches. Pull the taped ends off the table and fold it around the end of the braid so both sides are now taped.

Sew the ends of the braid to either end of the elastic. If you have a sewing machine make sure you do two rows of stitching on each side for the extra reinforcement.


Once you have done this you can add some ribbon around the outside of the place where the braid and the elastic intersect. As shown in this picture.

Now you have a beautiful braided headband. If you want to add the flower so it looks just like the picture here are the instructions for the extras.
Take your silk flower apart. Pull the center from the petals and carefully separate the petals.


Fold up the doily and as you sew the button through the hole in the center of the flower also sew the doily to the back.

Also sew your extra pieces of ribbon to the back. I threaded a few wooden beads onto the ribbon and tied the ends before I attached the ribbon.


Once you have attached the doily and the ribbon to the back of the flower tie all of your extra frill to the braided headband.
Wear and enjoy!

Ruffle Headband
Brought to you by ADOR
What you need:
-Flower petal template- located HERE
-Sheer fabric
-Felt
-Permanent fabric glue
-Headband (wide bands work best)
-Scissors
-Cardstock
What to do:
-Print the template on cardstock and cut out
-Trace template onto fabric: 12 Large, 20 Medium, 3 Small
To make the large flower:
-Fold in half.
-Flower petal template- located HERE
-Sheer fabric
-Felt
-Permanent fabric glue
-Headband (wide bands work best)
-Scissors
-Cardstock
What to do:
-Print the template on cardstock and cut out
-Trace template onto fabric: 12 Large, 20 Medium, 3 Small
To make the large flower:
-Fold in half.

-Fold in half again.
-Make a few quick stitches to hold in place.
-Cut a small circle of felt.
-Sew the folded petals to the edge of the felt circle.
-Make a few quick stitches to hold in place.
-Cut a small circle of felt.
-Sew the folded petals to the edge of the felt circle.

-Sew 8 petals around the edge and 4 in the center, then fluff.
Repeat steps to make the medium flower.

This is a diagram of how I assembled the petals on the headband.


Use small dots of permanent fabric glue to attach the large flower to the side of the headband.

Attach the medium size flower above the larger flower, towards the center.

Now all you have to do is attach petals down the sides.


Cute, huh?!
5 Strand Braided Headbands
Courtesy of Make It and Love It

Instructions:
First, find some old t-shirts. Or buy some jersey knit. Either way works.

Then, cut your fabric into long strips. I made my strips about twice as long as the measurement around my (or my daughter’s) head. The thick headband strips are about 2 inches wide and the narrow headband strips are about a 1/3 inch wide. You’ll need 5 long strips for one headband.

Next, stack your 5 strips on top of each other and sew together at one end. (Or hand stitch them or glue them.)

Now, pull on each strip of fabric so that they kind of curl on the edges.
Then lay your strips with the sewn edge up at the top (tape this down if that will help you while braiding) and then split up the strips into 3 on the left side and 2 strips on the right.

Now, to create this 5 strand braid……..you’ll kind of be braiding on the left side and then braiding on the right. And then back and forth until you’re done.
But let me explain a little better.
First, you’ll work on the left side. So grab the strip all the way on the left (pic #1) and cross if over the strip right next to it on the right(pic #2). Then grab the strip furthest to the right of this section (pic #3) and cross it over one strip to the left (pic #4). Now grab the middle of all 5 strips (pic #5) and bring it over the the right side (pic #6) so that you can start braiding on the right side. Now you have your strips separated into 2 strips on the left and 3 strips on the right…….but opposite from the beginning.

Now, you’re going to do the same thing on the right side………just mirrored from what we did the first time. So grab the strip all the way on the right (pic #1) and cross if over the strip right next to it on the left (pic #2). Then grab the strip furthest to the left of this section (pic #3) and cross it over one strip to the right (pic #4). Now grab the middle of all 5 strips (pic #5) and bring it over the the left side (pic #6) so that you can start braiding on the left side again.

**Something to remember: When you’re working on the left side or on the right side……..you’ll always start with the strip on the outside. So if you’re working on the left side……grab the strip all the way on the outside on the left. If you’re working on braiding on the right side…….start with the strip all the way on the outside on the right.
So, start again from the very beginning and work on the left side again (pics #1-5) and then on the right side again (pics #6-10).

You’ll need to adjust the tightness as you go and may have to tighten individual strips here or there.

Keep on braiding and braiding……keeping the tension about the same all the way down.

When you get to the end (or as long as you need it)……..sew (or hand-stitch or glue) the ends in place.

Then overlap the ends together and sew (or glue) in place.

**Before attaching, remember that knit will stretch and the woven design allows for stretch. So you want to make this headband smaller than your head so that it hugs your head and stays in place.
To finish it off (and cover up the ends), cut a rectangular piece of fabric that’s wider than the ends that you’ll need to cover. Fold the side edges in…….

And then stitch (or glue) one end on the inside of the headband.

Then wrap this piece of fabric around the headband, tuck the ends up……

And then stitch (or glue) this end down too.

And that’s it.
A nice and stretchy headband for you or a little girl you know.
Love these headbands!! You did a great job! I love the braided one made of t-shirts. I bet that is really comfortable to wear.
ReplyDeleteJayme @ Her Late Night Cravings
Thanks for the ideas!!!!
ReplyDeleteI have locs and it is hard for me to find headbands to suit my hair and my needs.
So i guess i will just make them!!!(^_^)I think i am going to try the t-shirt one first.
I think some of your ideas would rock on video!!!
Lioness
wooowww how many ideas!!!! thanks for your visit on my blog I hope you will want to follow me also on facebook
ReplyDeletehttp://keepintouchwithfashion.blogspot.com/ have a good day... keep in touch ....
These are awesome, the first two are so adventurous. I love the last one though, I would definitely wear those.
ReplyDeleteBy the way, thanks for the comment on my blog. I can't believe that happened to you! I would have been so freaked out. I wouldn't know what to do if I burned the T.V haha I'm grateful for just a hyper dog though. I'm glad everything still works and you and the dogs were okay. I hope the owners weren't too mad :/ haha
-Mar
http://girlinawholenewworld.blogspot.com/