Monday, February 20, 2012

Birthday Cake

Hey everyone! Hope you guys are doing well! I've been really busy trying to juggle school, work, and well, more work. Two Fridays ago was my birthday! It was absolutely fantastic. On Friday I had a nice lunch with the girls and at night I had my family party with my best friend, Shardi, her fiance, and my boyfriend. It was wonderful! Friday night, Ben told me to pack a bag because we were going somewhere for Saturday and Sunday. Creepy, right?! Hah only kidding! He took me to Indianapolis in the morning, which is about a 2 hour drive from home. We went shopping and walked around the city, and he told me we were going to P.F. Changs for dinner! My favorite! To my surprise, six of my friends showed up! All at different times too, so naturally I cried with joy multiple times. It was a great and yummy dinner, and I was so happy to have everyone there. Ben also surprised me with a necklace. It really was the best birthday ever :) I didn't have a cake for my birthday, because I requested turtle brownies, but I found these really cute cakes online! Take a look!


IMG_6953.wilton233cake

Thursday, February 9, 2012

The Blushing Bride!

Hey everyone! Today I wanted to share with you my best friend of FOREVER's blog! Shardi and I have been attached at the hip since high school. People even stopped referring to us as two separate people, combined our names, and we became one, Rashard. Ha! This is Shardi and I in High School. Now we both have brown hair!


Shardi is getting married to Brandt in September of this year and she has chosen me to be her Maid of Honor! I'm so excited! Without Shardi, I would not have this blog. She was the one who inspired me to start one, and she got me all set up with my very own blog :) Shardi has her own AWESOME wedding blog, which you must check out! She has all of the latest and best wedding inspirations and ideas. Below is a recent inspiration board she did for Valentines Day. Trust me, you won't be disappointed! Even if you aren't getting married anytime soon, you can find ideas for your friends and inspiration for outside things! Show her some love and let me know what you think! Click here! The Blushing Bride

Thursday, February 2, 2012

Super Bowl Football Food


Hey everyone! I'm sorry I haven't been blogging much lately, I've been busy! Right now I am in Cincinnati visiting my cousin Laura, her husband Tony, and little baby Wendy! Laura, Wendy, and I are having a wonderful day together! As most of you know, Sunday is the Superbowl! And it's in my home state! Even though the Colts didn't make it, it will still be a fun show! I'm excited for the commercials and the half time show, but mostly....the FOOD! Superbowl food is the best! It is usually a variety of appetizers and snacks. I like to make the foods festive and fun too! I picked a bunch of snacks in the shape of footballs for you all to make! Pick your favorite and let me know what you think! Click the caption to get your recipes!!


Football Whoopie Pies


Football Pizza Pockets


Chocolate Peanut Butter Footballs

 Chocolate Peanut Butter Football on green 2


Football Bites


Chocolate Covered Strawberry Footballs


ENJOY!!

Thursday, January 26, 2012

Mug Cake

Hey ladies! I hope everyone has had a great week so far. I got totally snowed in last weekend! I have absolutely no tread on my tires and my alignment is way off, so I was not driving anywhere. That's what boyfriends with new cars are for! I've known that I need new tires for a few weeks now, but knowing I have to pay over $400 for them, I keep putting it off. It is also so cold outside, I swear I can never get warm. Every night I crave watching a movie under a big warm blanket with fuzzy socks on, eating or drinking something warm. I have been hearing a lot about something called a "mug cake". These are cakes that are cooked in the microwave in a mug! Genius! Not only is it a quick fix, it is a delicious and cute fix! Why have I never heard of these?! Oh well, I'll just have to make a bunch to make up for lost time! Let me know what you think!

2 Minute Chocolate & Salted Caramel Mug Cake

What you’ll need: {makes 1 mug cake}
4 tablespoons all purpose flour
4 tablespoons sugar
3 tablespoons unsweetened cocoa powder
1/4 teaspoon baking powder
1/4 teaspoon salt
1 egg – beaten
3 tablespoons skim milk
1 tablespoon vegetable oil
2 salted caramels
What to do:
1. Into a small bowl add: flour, sugar, cocoa, baking powder, salt, egg, milk, and vegetable oil. Mix to combine.

2. Pour mixture into a regular sized coffee mug. Drop caramels into center of mixture one at a time.
3. Microwave on high for one minute and 30 seconds. If needed {if cake batter is still gooey}, microwave on high for up to an additional 30 seconds.


Nutella Mug Cake
mug cake Nutella Mug Cake
source
Ingredients
4 tablespoons self rising flour
4 tablespoons white granulated sugar
1 egg
3 tablespoons cocoa powder
3 tablespoons Nutella
3 tablespoons milk
3 tablespoons olive or vegetable oil

Method
1. Combine all ingredients in a largecoffee mug. Whisk well with a fork until smooth. Microwave on high for 1 1/2 – 3 minutes. (Time depends on microwave wattage. Mine took 1 /2 minutes.) Top with whipped cream and a little chocolate sauce if desired.
2. Top with whipped cream and chocolate syrup. Enjoy!
Strawberries & Cream Mug Cake
0005 10 Tasty Mug Cakes You Can Make in Just Minutes
Ingredients
1 egg
2 tablespoons strawberry yogurt, well stirred
1 tablespoon vegetable oil
1/8 teaspoon baking powder
1/8 teaspoon vanilla extract
4 tablespoons granulated sugar
5 tablespoons all-purpose flour
1/4 cup fresh sliced strawberries and whipped cream for serving
1. Coat the inside of the mug lightly with cooking spray and set aside.
2. Mix the egg, yogurt, vegetable oil, baking powder, extract, sugar and flour in a small bowl until completely smooth.
3. Fill the mug to halfway full and place it in the microwave. Bake it for 3 to 4 minutes, or until a cake tester comes out clean. Top with strawberries and whipped cream and serve.

Thursday, January 19, 2012

Valentine's Day Crafts

Hello lovelies! Besides Chinese New Year, Valentines Day is also coming up! For some people, this is an exciting holiday, and for others, it is not. Some like to make a big deal out of Valentines Day, but my favorite part is the cute stuff that goes along with it! I love pink and I love an excuse to decorate and make everything all girly and pink. It doesn't really matter to me what my boyfriend and I do for Valentines Day, but I'm going to have fun making all of these crafts and decorating my room pink and full of hearts. For those of you who don't have a significant other, you can throw a Valentines Day party, or even an Anti-Valentines Day party for your friends. It's a great excuse to get together with a fun theme. For Anti-Valentines Day, decorate in all green, because its the opposite color of pink. You can hang up broken hearts, voodoo dolls (fake ones please), and cut heart confetti in half for a table decoration. Whatever you plan on doing, just have fun with it! That's what Valentines Day should be about! Let me know what your plans are for V-Day, I would love some ideas! Happy crafting!
Below are some crafts I found for Valentines Day. Click the links underneath for your DIY instructions!

    1. Paper Heart Garland: Sparkle & Hay
    2. DIY Heart Glitter Nail Polish: Delighted Momma
    3. Origami Heart: B.loved
    4. Heart Bookmarks: Craft and Creativity
    5. DIY Origami Heart Cupcake Topper: Omiyage
    6. Sweet Heart Sugar Cubes: Craft Passion
    7. Candy Heart Rings: Blue Moss Girls
    8. Paper Quill Heart Pendant: Craftzine
    9. Valentine Snow Globe: Whipperberry
   10. Fabric Valentine Card: The Purl Bee
   11. Valentine Popcorn Invitation: Eat Drink Chic
   12. Candlestick Topiary Tutorial: Stay-at-Home artist
   13. Miniature Hand Embroidered Note: Cornflower Blue Studio


Here's a cute little table set up you can use for an Anti-Valentines Day party!
An Assortment of Anti-Valentine's Day

Monday, January 16, 2012

Chinese New Year Recipes

Hey hey! I hope everyone had a great weekend! In my previous post I told you guys a little bit about the Chinese New Year coming up January 23rd. Today, I want to give you some Chinese recipes that you can make for your own party, or for a date night! I guess it doesn't really matter what you use them for, but you should try them out! Here you are my lovelies :) Click on the links below each picture for the recipe!!!

Steamed Chinese Dumplings

Baked Crab Rangoon
Baked Crab Rangoon

Chicken Egg Rolls

Pineapple Tart

Egg Drop Soup
Egg Drop Soup

Fried Rice

Orange Chicken
Orange Chicken

Get Cookin' Ladies!


Tuesday, January 10, 2012

Chinese New Year

Hello lovelies! I don't know if many of you know, but January 23rd marks the day of the Chinese New Year. It is considered the biggest holiday in China! This year marks the year of the Dragon. (Click HERE to discover your Chinese zodiac). There are many cool, unique traditions that go along with this holiday. For example, the giving of the red bags. This is when parents give their children money in a red bag that signifies good luck for the year. Parents also give their own parents the red bags to signify a longer and fuller life.  My boyfriend's family is from China, so I get the privilege of celebrating with them! They go all out! His grandma makes dumplings the night before and puts pennies in some of them (after they've been boiled and cleaned, of course), and whoever has a penny in their dumpling, gets a dollar. The goal is to eat as many dumplings as you can, to get the most money! Fun, huh?! You can read more about Chinese New Year HERE.  I love learning about Ben's family's culture, and it is so fun to be a part of. Everyone should celebrate Chinese New Year! It would be a fun themed party and a good excuse to get all of your friends or family together. Today I'm going to show you some crafts you can DIY for Chinese New Year, and in later posts, I will be giving you recipes and good ideas for decorations! I will also be posting pictures from last year's Chinese New Year celebration. I hope you'll be just as excited as I am! Click on the sources below for your DIY tutorials!


Sources for DIY projects!!!
Row 1, Picture 1: All About Ami
Row 1, Picture 2: nifty thrifty things
Row 1, Picture 3: forty weeks...and then some
Row 2, Picture 1: forty weeks...and then some
Row 2, Picture 2: Fairy Fox (No DIY tutorial)
Row 2, Picture 3: Kaboose
Row 3, Picture 1: Omiyage
Row 3, Picture 2: Kaboose
Row 3, Picture 3: Creative Kismet

Sunday, January 8, 2012

Winter Snack Recipes

Hello lovelies! I hope everyone had a good weekend! I did! I'm so happy because lovely RANDOMLY REESE nominated me for my first blog award! Yay! I am extremely excited and feel very appreciated! Such a nice feeling. Make sure to check out her blog, she's absolutely a-mazing! You won't be disappointed! Thank you Reese! :)

One of my 100 New Year's resolutions is to do more baking! Yay for food! I don't think my boyfriend is convinced I'm a good cook yet...(convincing him is yet another one of my resolutions.) hah! This might be a tough one. My awesome new blogging friend, Reese said she likes when I post recipes, so here you are girl! I wanted to make some fun snacky recipes. I would love your feedback on them too! (Thank you Lioness!) These yummy recipes are for you to spoil your Hunnys with. Make it a date with a movie on the couch under the blanket, with some homemade snacks! Most likely, mine will be during a basketball game...yay. These are also good for a well-deserved girl's night! Hope you love these as much as I do!


San Francisco Garlic Fries
From: Tracey's Culinary Adventures
These fries are yummmyyy. Who doesn't love french fries?! They are a guilty pleasure for me, but I feel MUCH better about eating these because they are baked, not fried. So indulge in some "baked fries" and don't feel bad! 

San Francisco Garlic Fries

Ingredients:
nonstick cooking spray 
2 1/4 lb russet potatoes, cut lengthwise into batons (see pics)
3 tablespoons vegetable oil, divided
kosher salt and freshly ground pepper 
4 garlic cloves, minced
2 tablespoons chopped flat-leaf parsley


San Francisco Garlic Fries

(To cut the fries - cut a small section off one side of the potato so you have a flat surface to begin your cutting. With that flat side down, slice the potato into 1/4 to 1/3-inch wedges, then stack the wedges and slice into 1/4 to 1/3-inch batons. )

Preheat oven to 450 F.  Spray two large, rimmed baking sheets with nonstick cooking spray.

Combine the potatoes with 2 1/2 tablespoons of the oil in a large bowl and toss to coat.  Season with salt and pepper.  Divide the potatoes between the two baking sheets and spread in a single layer.

Bake for 30 minutes, or until the fries are tender and browned (no need to flip or toss them while they're in the oven but I did rotate the baking sheets a few times).  Increase the oven temperature to 500 F and continue cooking until the fries are dark brown in spots, another 5 minutes or so.

Meanwhile, whisk the remaining 1/2 tablespoon of oil with the garlic and parsley in a large bowl.  Add the hot fries and toss to coat.  Season to taste with salt and pepper before serving.


No Bake Cookies
These cookies only have THREE ingredients. And they taste a-mazing. How easy is this, seriously?! I love the fact that you can make something this delicious with only 3 ingredients. Mind blowing! 

Ingredients:
  • 1 1/2 cups chocolate chips
  • 1/2 cup creamy peanut butter
  • 3 cups corn flakes cereal
Steps:
1. Melt the chocolate chips in the microwave. Add the peanut butter. Mix until well combined.
2. Fold in the corn flakes until evenly coated.
3. Using a tablespoon, drop the mixture on to wax paper or parchment lined cookie sheets.
4. Allow these to cool in the fridge or the freezer until hard. Enjoy with a huge glass of milk!

Buttery Soft Pretzel
By: La Petit Brioche <--click there for more pics 
I am in love with Auntie Anne's, which is what this pretzel reminds me of. Now this recipe is a little more time consuming, but completely worth it. I'm totally going to trick my boyfriend into thinking I'm a baking genius with this recipe. Do you know anyone who bakes homemade soft pretzels as good as overpriced soft pretzel places you can barely afford to go to? This girl. 

Ingredients

  • 4 teaspoons active dry yeast
  • 1 teaspoon white sugar
  • 1 1/4 cups warm water (110 degrees F/45 degrees C)
  • 4.5 cups all-purpose flour
  • 1/2 cup white sugar
  • 1 1/2 teaspoons salt
  • 1 tablespoon vegetable oil
  • 1/2 cup baking soda
  • 4 cups hot water
  • 1/4 cup kosher salt, for topping (optional)
  • 1/4 cup butter, for brushing
Directions
1. In a small bowl, dissolve yeast and 1 teaspoon sugar in warm water. Let stand until creamy, about                     
         10 minutes.
2. In a large bowl, mix together flour, 1/2 cup sugar, and salt. Make a well in the center; add the oil and yeast mixture. Mix and form into a dough. If the mixture is dry, add one or two tablespoons of water. Knead the dough until smooth, about 7 to 8 minutes. Lightly oil a large bowl, place the dough in the bowl and turn to coat with oil. Cover with plastic wrap and let rise in a warm place until doubled in size, about 1 hour.
3. Preheat oven to 450 degrees F (230 degrees C). In a large bowl, dissolve baking soda in hot water.
4. When risen, turn dough out onto a lightly floured surface and divide into 12 equal pieces. Roll each piece into a rope and twist into a pretzel shape. Once all of the dough is all shaped, dip each pretzel into the baking soda solution and place on a greased baking sheet. Sprinkle with kosher salt.
5. Bake in preheated oven for 8 minutes, until browned. Brush with melted butter. Enjoy!

Elephant Ears (or Palmiers)
Elephant ears are the only reason some people go to carnivals. I honestly can't say that I blame them. I have also never seen a small elephant ear, besides this one! And trust me, this is small compared to ones you get at a County Fair. These are cute and D-lish!

ingredients:

2 cups granulated sugar
1 teaspoon cinnamon
1/8 teaspoon kosher salt
2 sheets puff pastry, defrosted

directions:

Preheat the oven to 450 degrees F.
Combine the sugar, cinnamon, and kosher salt. Pour 1 cup of the sugar mixture on a flat surface such as wooden board or marble. Unfold each sheet of puff pastry onto the sugar and pour 1/2 cup of the sugar mixture on top, spreading it evenly on the puff pastry. This is not about sprinkling, it's about an even covering of sugar. With a rolling pin, roll the dough until it's 13 by 13-inches square and the sugar is pressed into the puff pastry on top and bottom. Fold the sides of the square towards the center so they go halfway to the middle. Fold them again so the two folds meet exactly at the middle of the dough. Then fold 1 half over the other half as though closing a book. You will have 6 layers. Slice the dough into 3/8-inch slices and place the slices, cut side up, on baking sheets lined with parchment paper. Place the second sheet of pastry on the sugared board, sprinkle with the remaining 1/2 cup of sugar mixture, and continue as above. (There will be quite a bit of sugar left over on the board.) Slice and arrange on baking sheets lined with parchment.
Bake the cookies for 6 minutes until caramelized and brown on the bottom, then turn with a spatula and bake another 3 to 5 minutes, until caramelized on the other side. Transfer to a baking rack to cool.

See you next time ladies! Get cookin'!

Wednesday, January 4, 2012

Food On A Stick

Hey there! So everybody and their mother knows that Cake Pops are extremely popular at this moment, right? Of course. Well, I found something that takes the whole Cake Pop idea to the next level. If we can put cake on a stick, why can't we put other things on a stick that look cute too? WE CAN!! Maybe I'm the last one to catch this train, but I honestly never thought beyond a Cake Pop and I was a-mazed when I saw these fantastic foods on a stick. What makes them better than regular foods, you may ask? Um... because they are small and on a stick! Duh! Ladies, with these you will have the cutest parties, I promise. I know you're probably wondering if I have ever heard of a shish kabob, and yes I have, but these are different! I hope you enjoy these as much as I do. They are so darn cute! Tell me what creative foods you want to put on a stick!

Poptarts on a Stick
Bakerella


poptartpopsAgain 300x214 Poptart Pops & an Interview with Bakerella


FOR THE TWO-BITE POPTARTS1 c. fresh cherries, pitted and diced
3 T. sugar
2 T. cornstarch
2 T. water
1/2 tsp. almond extract
1 pkg. prepared pie crusts
FOR THE POPS
wooden popscicle sticks
FOR THE GLAZE1 c. powdered sugar
1-2 T. milk
1/2 tsp. vanilla
food coloring and sprinkles (optional)
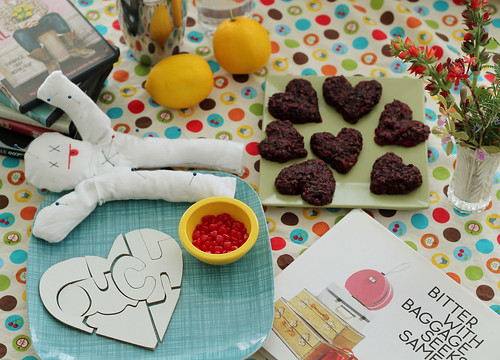
In a small saucepan, combine cherries, sugar, cornstarch and almond extract. Heat on stove over medium heat until mixture has thickened. Remove from heat and allow mixture to cool. Unroll pie crusts and using a pizza cutter to slice them into 1 1/2″x 2″ rectangles (I used a ruler to measure mine into equal sizes.  Just use a butter knife to score your pie crust before cutting). 
Place a wooden popscicle stick on top of one of the cut rectangles, then spoon a small amount (about 1 1/2 tsp.) of cooled cherry filling into the center of the pie square, taking care not to get it near the edges.   Gently lay a second rectangle over the top of the cherry filling.  Press the edges of the rectangles together with a fork.  Transfer to a baking sheet.  Bake poptart pops in an oven preheated to 400 degrees for 8-10 minutes, or just until the edges begin to brown. 
In a small bowl, combine powdered sugar, milk, and vanilla to make glaze.  Tint with food coloring, if desired.  Spoon over cooled poptart pops, sprinkle with colored sugar, and allow to the glaze to harden slightly before serving. Enjoy!
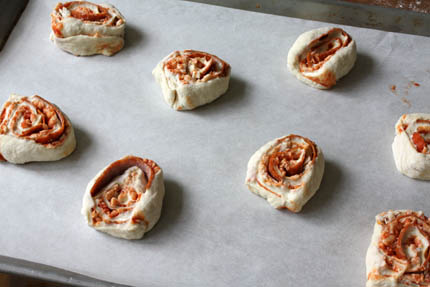
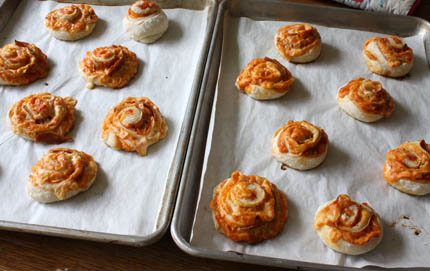
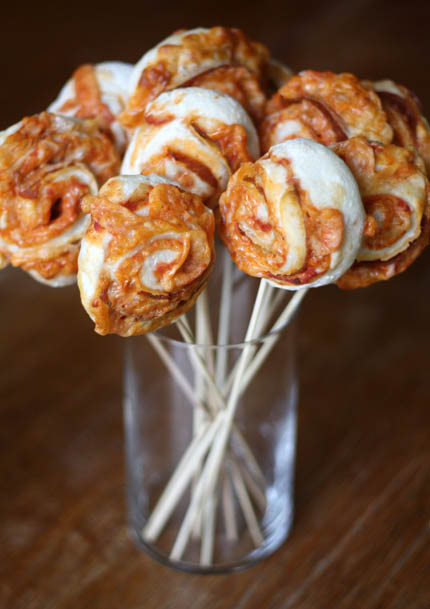
Pizza on a Stick
Makes about 24
1 pound (grapefruit size) piece of dough (I used the Master recipe (page 25), but Olive Oil dough (page 134), Whole Wheat (page 74-9) or even Brioche (page 189) would be great!)
1/2 cup pizza sauce or crushed tomatoes
1 1/2 cups grated mozzarella cheese
pepperoni or other favorite toppings
preheat the oven to 400 degrees
Set up 2 0r 3 baking sheet pans with parchment or Silpats, set aside.
pizza-on-a-stick01
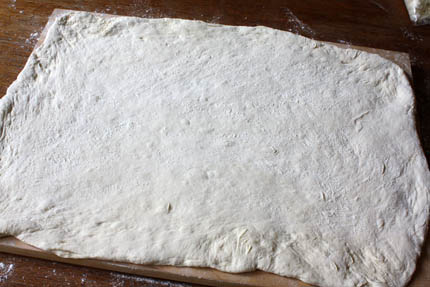
Roll the dough out to a 1/4-inch thick rectangle, using enough flour so the dough doesn’t stick.
pizza-on-a-stick02
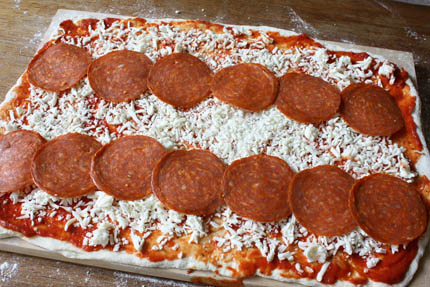
layer on the sauce, cheese and pepperoni. Leave some of the cheese exposed so that it can melt and act as a glue, to hold the pizza rolls together.
pizza-on-a-stick03
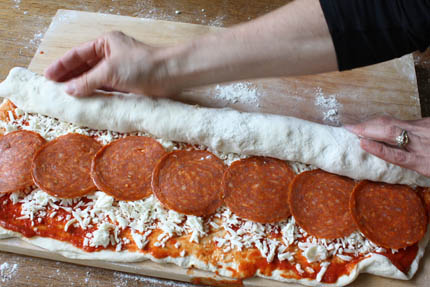
Roll the dough into a log, starting at the long end.
pizza-on-a-stick04
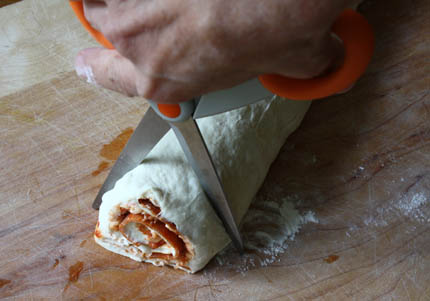
Using kitchen shears, cut the dough into 1/2-inch thick buns. (I only baked 16 and then wrapped the rest of the log, refrigerated it and will bake it later this week. You can also cut and freeze the individual pizza rounds to thaw and bake within the next 2 weeks.)
pizza-on-a-stick05
Place them on the prepared sheet, leaving plenty of space for them to expand when they bake. Allow them to rest on the counter for about 15-20 minutes.
pizza-on-a-stick06
Bake for 15-18 minutes, or until golden brown and the cheese has melted and caramelized a bit.
pizza-on-a-stick08
Put them on a stick or let them cool and pack them in a lunch box!
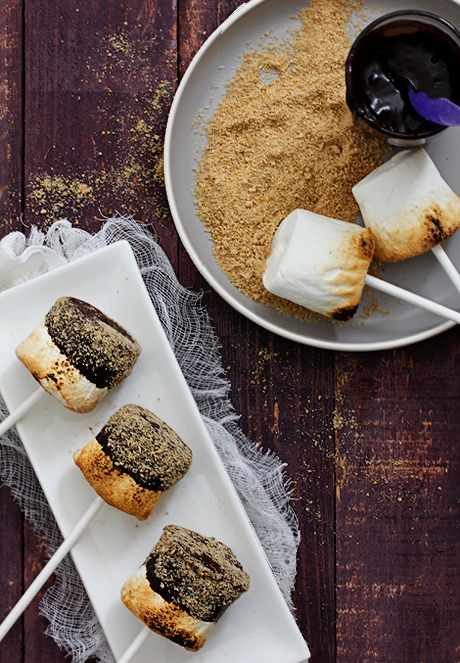
S'mores Pop
Smores Pop
No recipe for this dessert. Just a few notes:
  • You will need a bag of jumbo marshmallows, crushed graham crackers and some melted chocolate.
  • You can of course make these without roasting the marshmallows, but really, marshmallows taste so much carmelized.
  • Assembly: Stick a popsicle stick in one end and slowly turn the marshmallow 1/2 inch above the flame until golden. Dip the roasted marshmallow in melted chocolate and then roll it in crushed graham crackers. That’s it – enjoy!


DIY Scrapbook Paper Tree

Hello lovelies! I hope everyone is accomplishing some of their New Year's goals. One of my goals this year is to buy a house. I am already pre-approved, I just have to find the perfect one for me! That is a very hard thing, mind you. There are not a lot of "good" homes on the market, and there is a certain area I am looking to buy in. Not always the easiest task, but until then I am continuing to save my money, so that I can decorate my humble abode all cutesy. One of my goals for my house is to have lots of homemade decoration pieces in it. It would be really neat for me to look around and see things that either I made, or my friends made, just for my house. I saw this little project on Craftgawker a long time ago, added it to my favorites, and never forgot about it. It is this cute little tree in a vase with little fun-colored scrapbook leaves on branches. How creative! This is brought to you by Two Girls Being Crafty and I'm going to share the tutorial with you today! You can make the leaves any pattern or color you want. You can do a green and brown theme, a rainbow theme, or any theme you'd like. Your choice! Let me know what you come up with!

Scrapbook paper tree

This simple project uses scrapbook paper leaves to create a bright and cheery Spring ambiance for your home. You could also use these beautiful trees in a wedding, baby shower, bridal shower, birthday party... the possibilities are endless!

What You Will Need:

Scrapbook paper  
Branches
Floral Wire (I used 24 gauge wire)
Glue (You can use scrapbook or tacky glue, but I just used good ole Elmers)
Scissors
Cardboard/cardstock/chipboard 
Vase or Pot to place your branches in
Newspaper 

The awesome thing is - you probably already have most of these supplies on hand. I only had to purchase the floral wire for a little over $1 (with a coupon). What an inexpensive way to bring Spring into your home!
  
Let's Get Started:


Scraps for Scrapbook paper tree

First, drag out your unseemly healthy assortment of scrapbook paper scraps. If you don't (yet) have a unreasonable amount of scrapbook paper (and everyone should), then just head over to your local craft store - Jo-Ann, Hobby Lobby, or Michaels and pick out your favorites.


Cut out your scrapbook paper leaves

Cut out a template of your leaf from the cardboard (you can also use chipboard or card-stock). I used two different sizes of leaves - one small and the other a lot larger. Try to make the leaves as symmetrical as possible (which I did not realize until later). This will help with pairing up a back and front leaf later on. Using your template, cut out as many leaves as you want. Cut them in even numbers because, again, you will be pairing them up later on.


DSC05622

Take your floral wire and cut strips anywhere from 5"-8" long. I know that's a big range, but I'm taking into account the different size leaves. If it's a larger leaf, you will want a few extra inches of wire. 


Making scrapbook paper leaves

Lay down some newspaper next to your workspace. Take one of your leaves and put a thin strip of glue down the center. Place a piece of wire on the glue. Find a leaf of the same size and same scrapbook paper (or different paper- this is your project!) and place it on top of the glue, sandwiching the wire and forming a "vein" down the center of the leaf. Place your newly made leaves on the newspaper. Keep going until you've made all of your leaves. 


Scrapbook paper leaves on tree

Now for the fun part! Start placing your leaves on your tree by wrapping the floral wire around a branch. You can arrange them in a natural way (as pictured above)...


Scrapbook paper leaf

...or make them funky.


Scrapbook paper leaf tree

And you're done! This project is so easy. You can make a huge tree or just make a small, simple one. Do ten of them for an event, or just create one for your humble abode. Either way, take this idea and run with it. You can create some Spring magic using only a few supplies!