Showing posts with label Christmas craft. Show all posts

Tuesday, December 13, 2011

DIY Sequence Trees

Hey hey! I am super excited this post because it is my (and Shardi's) VERY OWN IDEA!! We were shopping at Pier 1 and saw these awesome sequence Christmas trees. We thought they were a-mazing...until we saw the price tag. Oh wow, they were expensive! Who has that kind of money to blow on a Christmas decoration piece that you use for one month a year?! Plus, you, of course, need more than one!! It was then that we decided we would try and make one!! We went to our local Hobby Lobby and picked up a few bags of sequins, some pins, and some styrofoam Christmas trees. We then got to crafting!  These trees aren't the quickest craft in the world, but they are definitely beautiful! They make a great decoration piece and gift! I gave them to my whole family last year for Christmas. Everyone loved this awesome homemade gift! I did colors that would match their living rooms or bedrooms. Here's a tutorial on how to make your very own sequins Christmas tree and pictures of some I have made. Let me know what you think!!!

DIY SequinsTrees


What you need:

Sequins (small & large)


Small Pins


Styrofoam tree 


An organizer box (Optional)


Steps

 Pick your colors for your tree & buy your sequence. Get BIG and small sequence. You can use any variety of colors you would like. Make sure to get a couple different colors in both sizes, unless you want your tree one color, which is fine!!


 Put a small sequence on a pin and then stick the big sequence through the pin after it. I didn't use the hole for the big sequins, because I felt it was too close to the edge. I just poked it in a little further. It should look like this: 

image.jpeg


image.jpeg


I like to pre-make a bunch of these for the tree, so it goes faster! 

image.jpeg

Once you pre-make some, start sticking them in the tree! I found that starting on the bottom and working your way to the top, works the best. 

image.jpeg

image.jpeg

image.jpeg

Go up all the way to the top! If you have any open space, you can fill it in with your small sequins. The top of mine looks like this:


Here is the finished product!!
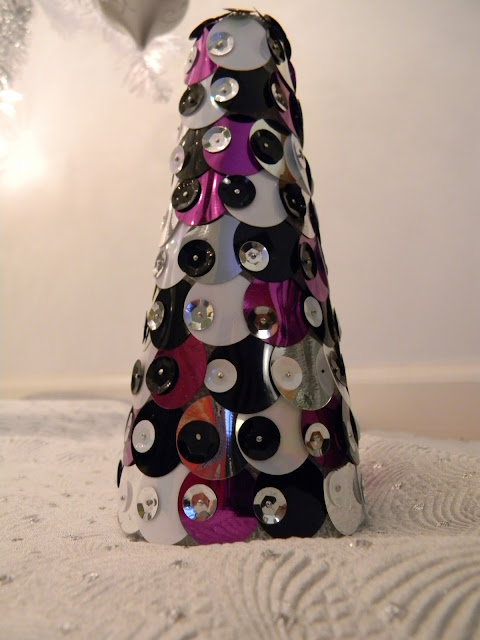
Voila!!

Here are some more! Send me your pictures!


Sunday, December 11, 2011

DIY Snow Globes

I think we can all agree that there are infinite purposes of mason jars. Well, I found the best use for one. My bestie, Shardi and I first came across these snow globes in a mason jar, at Anthropologie. They are the cutest! They had salt shaker snow globes too..so clever. But again, why buy it, when you can make it?! Everybody loves a good snow globe. They are great Christmas decorations and good gifts too! I love how you can personalize them for each person. Make a Star Wars one for your nerdy brother, a bird one for your grandma, and a basketball one for your boyfriend. You can put them in a jar or any kind of bottle. I personally love a good snow globe, especially the Disney princess ones. Annndd.. you guys know where to find me if you ever spot a good Harry Potter snow globe. Anyways, I found an easy tutorial online, thanks to Julie Ann Art, so here you are my dears! Be creative!

DIY Mason Jar Snow Globes
What you'll need:
Any jar that seals
Distilled Water
Liquid Glycerin (available at drugstores)
Glitter
Figurines
Epoxy/Crazy Glue

Using the Crazy Glue, attach your figurines to the lid of the mason jar. Let them dry completely. (I waited 24 hours to be sure.)
Next, fill your jar almost to the top with distilled water. Add a dash of liquid glycerin (this is used to make the glitter fall more slowly). The amount is glitter you add is sort of at your own discretion. Screw the cap on tightly and shake your jar to get the glitter moving.
 
That was easy, huh?! Here are some more cute ones for you to get inspiration from!!

penguin-necklace snowglobe
Snowman
apartmenttherapy.com


Friday, December 2, 2011

Leather Bracelets

Hey Crafters!
Need a creative, one-of-a-kind Christmas gift for a girlfriend? How about a leather bracelet, or two?!  I have two great tutorials for you today, thanks to Delighted Momma and Oh the lovely things, on making two different kinds of lovely leather bracelets!. I thought both of these were just delightful :) I love unique projects like these! You can find all of the supplies for these cuties at your local craft store. My local Jo-Anne's has a light tan color, dark tan color, and a black color to choose from. I like the black and dark tan the best! They are about $4 for one strip. You need an entire strip of leather for the bow bracelet, but I bet you can get two bracelets out of one strip of leather for the painted chevron bracelet. Not a bad deal! The only frustrating part for me with the bow bracelet, was getting my needle through the leather. Not the easiest task in the world, but 5 minutes of frustration is so worth this awesome bracelet. Check it out and let me know what you think! Happy crafting!


Leather bow cuff bracelet


You will need :
- A piece of leather, approx. 22cm x 10cm (approx. 8.7" x 4")
- Scissors
- Leather glue or super glue
- Thread
- A snap button

1. Cut an oval piece of leather, approx. 22cm x 10cm (approx. 8.7" x 4"). You can make it longer or smaller, depending on the size of your wrist.


2. Form a bow.


3. Secure the bow by wrapping thread around it and knot.


4. Cut a small rectangle of leather, approx. 4cm x 1cm / 1.6" x 0.4"


5. Glue the small band of leather over the thread.


6. Sew the snap button, one part of the button at one end of the leather, and the other at the other side.


And Voila!


DIY Painted Chevron Bracelet

What you will need:
  • Strip of leather (found at Michaels)
  • Some kind of closure. I used button snaps
  • Paint brush
  • Acrylic paint
  • Scissors
  • Blue painters tape

Decide how wide you want your bracelet and cut the leather accordingly.

Cut out thin triangle strips like above and place evenly spaced along the leather strip.
Paint the strip of leather.
Wait about 20 minutes until the paint is dry.

Attach the button closure.

Thursday, December 1, 2011

Ornaments

Hey pretties!
I think we have all made our own Christmas ornaments at one time or another. If you're like me, you have a bunch of gaudy ones from grade school with your face plastered on the front of it. Oh, yay... ;) Even if you had the worst buck teeth ever, Mom probably still to this day, loves to put it front-and-center on the Christmas tree. Lucky you! I assure you that not all homemade ornaments are bad! I love making my own ornaments; it really puts me in the Christmas mood. Whether you make a paper, felt, plastic, or glass ornament, it is better than the rest because YOU made it! With all of these cute DIY ornaments, you can switch out all of your old embarrassing ornaments for these cute ones! Goodbye buck teeth! Most of these awesome ornaments have tutorials for them, so click on the links underneath the pictures to find out how to make them!

You can buy glass or plastic ornaments like these at craft stores that are empty and you can just pull the tops right off and back on. Stuff them with paper, feathers, little painted styrofoam balls, glitter, leaves, or even paint them! Be creative! Send me pictures of the ones you make and I'll put them up! Happy crafting!

Elisa McLaughlin
 
Laura wears

Cook-Love-Craft
dontbothermeimreading
The Cheese Thief
The Cheese Thief
Creations by Kara
The Cheese Thief
Craft bits

Compulsive Craftiness

Craft bits


Tuesday, November 29, 2011

Stockings

Hello lovlies!
For me, Christmas morning would not be the same without a full stocking! I don't know why, but it is so fun to find a million (maybe not that many) little things stuffed to the max in a giant sock. Stockings also really dress up a room for the Holidays. Whether you have two or five stockings, they always look so stinkin' cute! They can be hung from a fireplace, staircase, window ledge, door, or anywhere you can think of!  They also make fantastic gifts. You can really personalize a stocking for someone, and like I said, it's not that hard! You will come to realize that I am a fan of simple, but awesome crafts. So here, if you're boyfriend/husband likes a certain football team, then make him a stocking with his favorite team logo and colors. If you're Mom has a really fancy living room, make her stockings to match! If you have a fun, one-of-a-kind best friend like I do, make her a busy and eccentric one! Be creative! Even add their names on them! (or nicknames). I like to make my stockings extra large so that a lot of stuff can be put in there! But of course I also like to make them cute!  And you don't have to make it shaped like a sock! Think outside of the box! You can be different and do a jester style, a high heel, or a boot if you want. If you sew, it is pretty easy to make a basic stocking. You basically draw out a pattern of your stocking, cut it out, and sew it together. If you don't know how to sew, you could always buy a basic stocking or get an old one, and dress it up using a hot glue gun. I'm not always the best sewer, but I am a master of the hot glue gun! I'm working on one that I will post when it's finished (hopefully soon). Here are some stockings I found to get you inspired. These are sincerely the most fun stockings ever! Some of them you can even buy! Click on the captions for their original site. Don't forget to send me yours so that I can post them! Happy sewing! (Or gluing)

Items you can use to dress up a stocking
-Patterned fabric
-Fringe
-Jingle bells
-Feathers
-Ruffles
-Poms
-GLITTER
-Fabric paint
-Fur
-Buttons
-Fabric
-Bows
2 Custom Christmas Stockings Old School Collection Boa Tops and Cuffs, DIY Bold Bright Fun Funky Retro Vintage Mid Century Modern
UrbanCreative

Blue Fur Trimmed Pendleton Christmas Stocking
RavenBear
FIVE SEUSS Stockings - Pick Your Colors - Choose Five Striped Christmas Stockings Inspired by Dr Seuss
GoodWishesQuilts